Quantcast
Channel: vRealize Automation – VMware Cloud Management
Viewing all 216 articles
Browse latest View live

How to use vRealize Automation with SSL offloading in multi-arm load-balancing topology

$
0
0

With the development of newer and faster load balancers or Application Delivery Controllers (ADC) we are seeing more and more use cases where SSL termination is required. Some of those use cases include SSL offloading and optimization, content caching and filtering, application firewalls and many others. In this guide we will cover the basic SSL-to-SSL configuration of VMware NSX, F5 BIG-IP and Citrix NetScaler with vRealize Automation 7.x.

You have to keep in mind however that the ADCs nowadays provide multiple features and options, while most of them will probably work we cannot cover all possible combinations. Please test any changes in your lab environment before deploying them in production.


SSL offloading

When talking about SSL offloading we usually imagine a connection in which the client-server SSL session is terminated at the ADC and the connection between ADC and back-end systems is not encrypted. This way the burden of encrypting and decrypting the traffic is left to the ADC. We can also do some interesting things at the ADC, such as content rewrite, URL redirection, application firewalling and many more. However, since our traffic is not encrypted to the back-end systems any compromise in our internal network would expose our sensitive information. That is why SSL – Plain mode is not supported by vRA.

Since SSL – Plain is too risky but we still want the advantages of a modern ADC we can do SSL termination and talk with the back-end systems via encrypted channel. In the case of SSL- SSL mode the connection Client – ADC is encrypted in one SSL session and the connection ADC – back-end server is encrypted in another SSL session. This way we can still achieve performance boost and do advanced content operations but without having the risk of exposing un-encrypted traffic.

This mode can be best described using the following figure:

diagram1


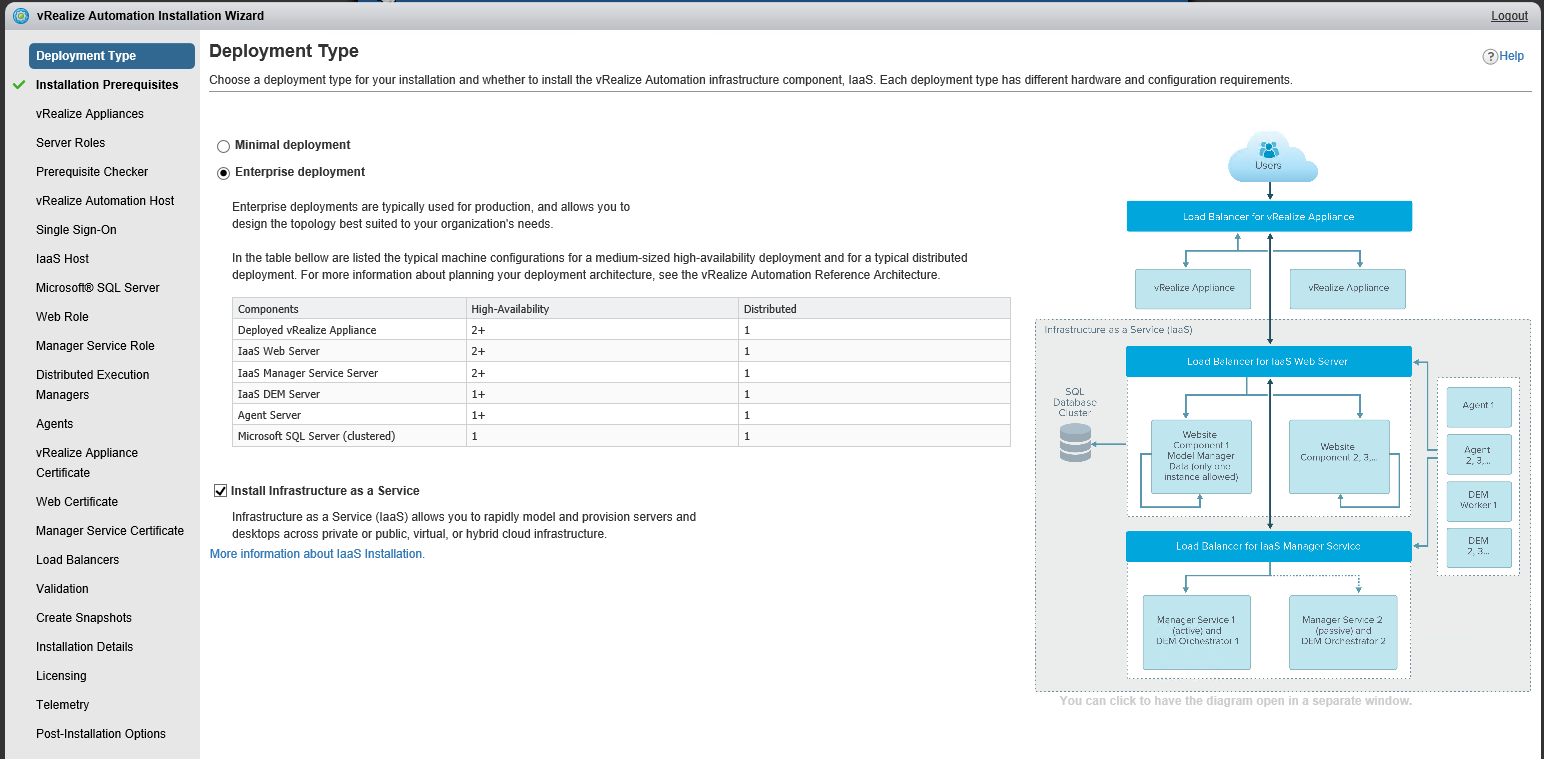
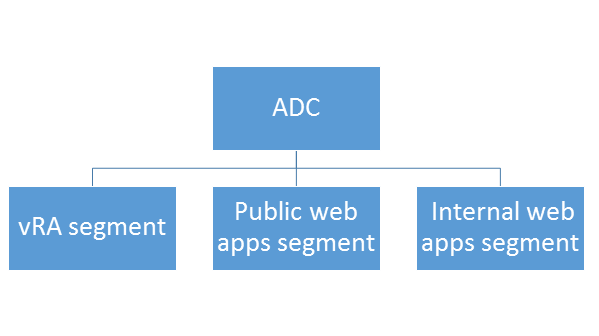
Multi-arm configuration

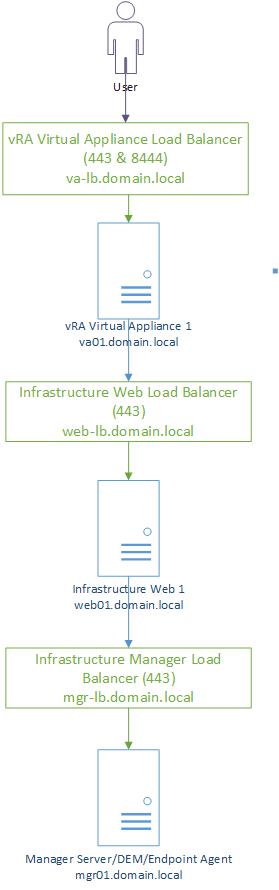
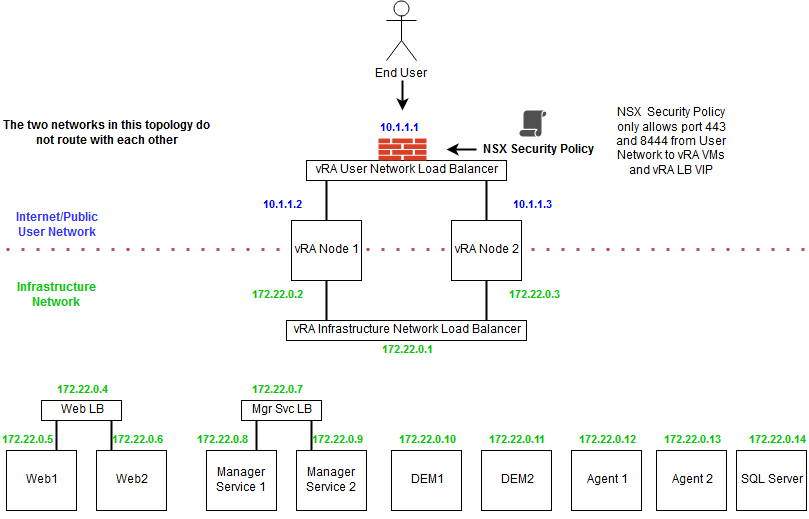
Traditionally vRA deployments are done in one-arm topology. In this topology the ADC and the vRA components sit on the same network. While simple this topology is not always optimal if we want to achieve service isolation. This is why here we will use multi-arm topology where the ADC and vRA components are deployed in different networks.

This topology can be best described using the following figure:


diagram2


Certificates

For simplicity in this guide we are going to use the same certificate/private key pair on the ADC and the vRA components. It is possible to use different certificates, however since some of the vRA internal communication is done via the ADC you have to make sure that the vRA components trust the ADC certificate.

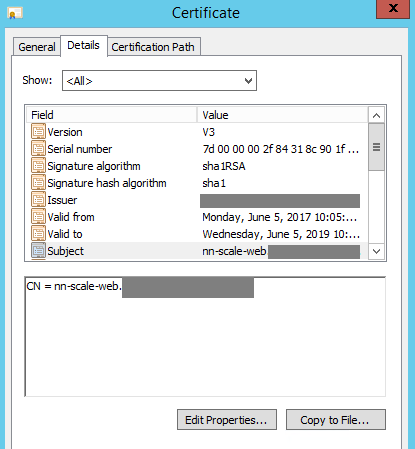
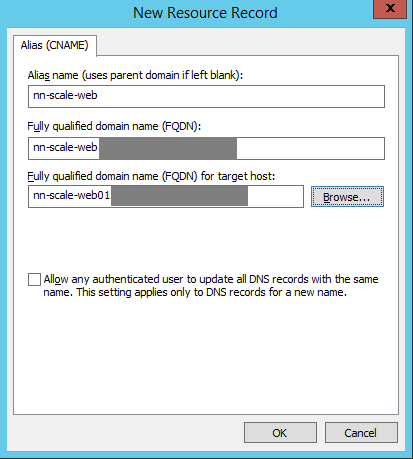
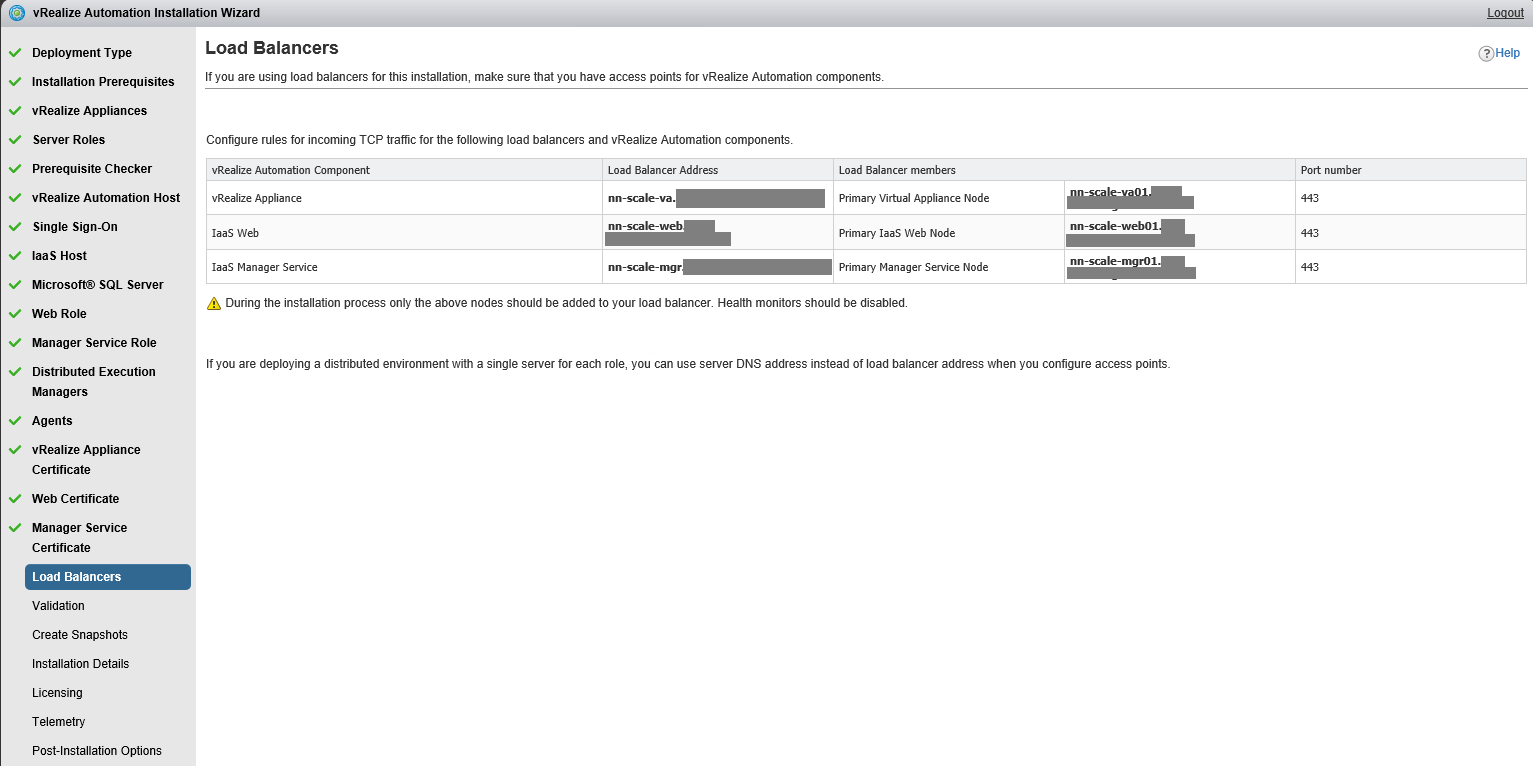
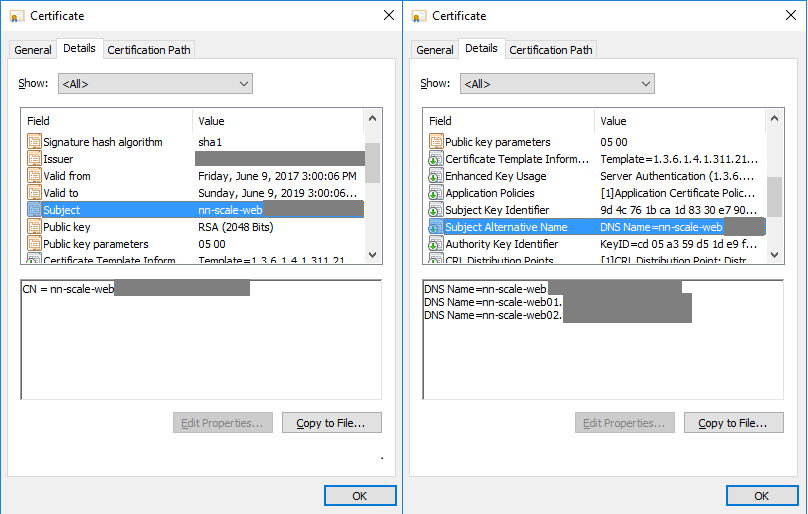
When issuing your certificate make sure that it includes the following attributes:

Common Name (CN) = the ADC virtual server used for the vRA appliances
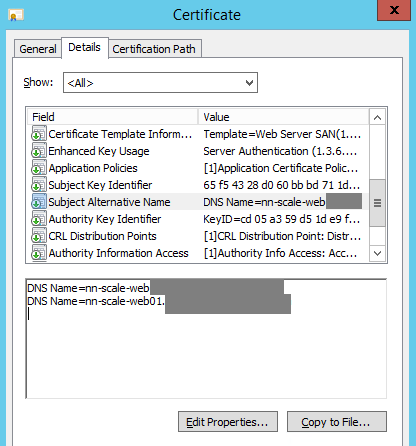
Subject Alternative Name (SAN) = the ADC virtual servers for IaaS Web, IaaS Manager, DNS names for all vRA components, IPs for all ADC virtual servers and all vRA components


Example:


Type Component Record
CN ADC for vRA appliances vralb.example.com
SAN ADC for IaaS Web and Manager weblb.example.com, mgrlb.example.com
SAN vRA appliances vra01.example.com, vra02.example.com
SAN IaaS machines web01.example.com, web02.example.com
mgr01.example.com, mgr02.example.com
SAN All IPs of both ADC and vRA machines 10.23.89.101, 10.23.90.223
10.23.90.224, 10.23.89.102
10.23.90.226, 10.23.90.227
10.23.89.103, 10.23.90.228
10.23.90.229


More information about vRealize Automation certificates can be found here.

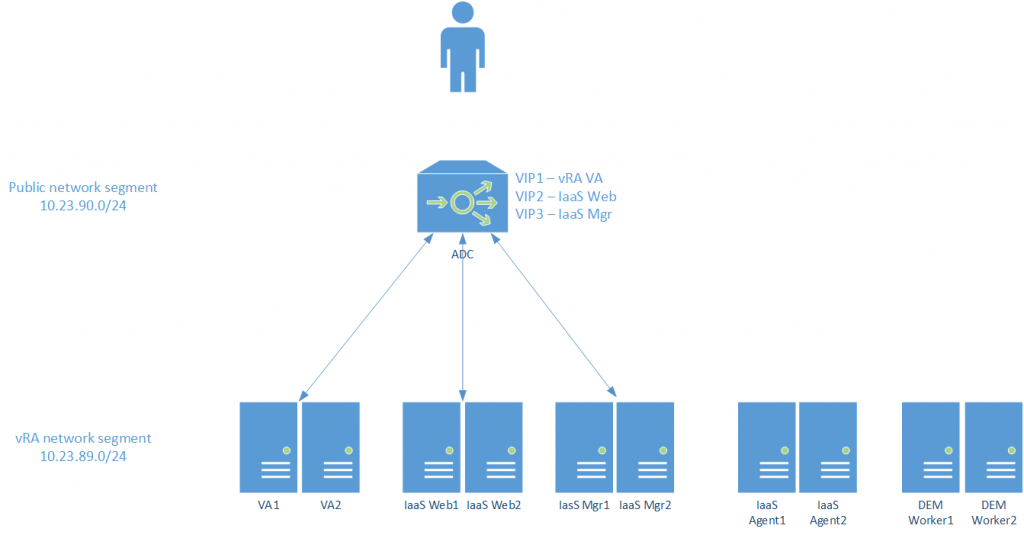
But enough theory, in the next section we will learn how to configure NSX, NetScaler and BIG-IP with vRA 7.
In our lab we used the following product versions: NSX=6.2, 6.3, NetScaler=11.0, BIG-IP=11.6, vRA=7.2, 7.3

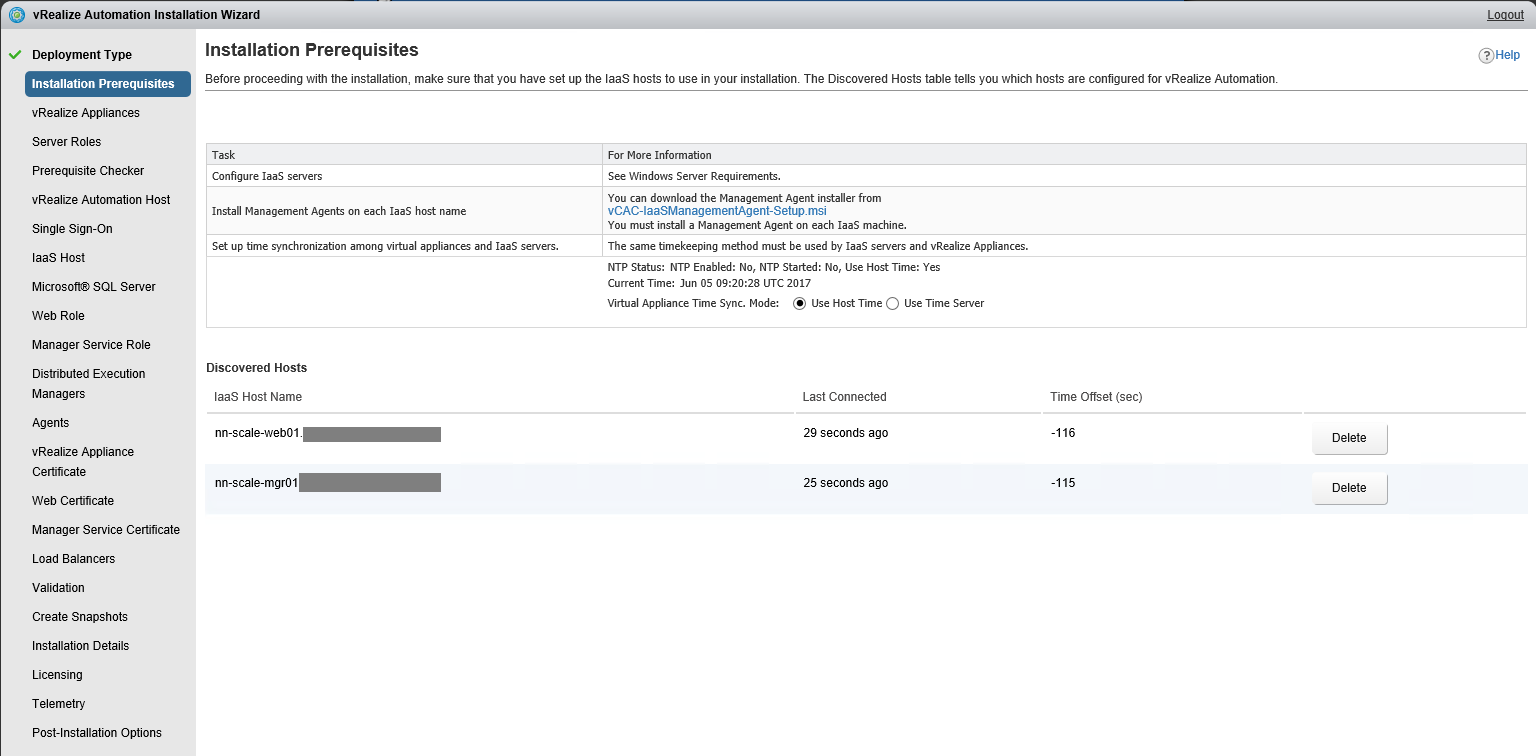
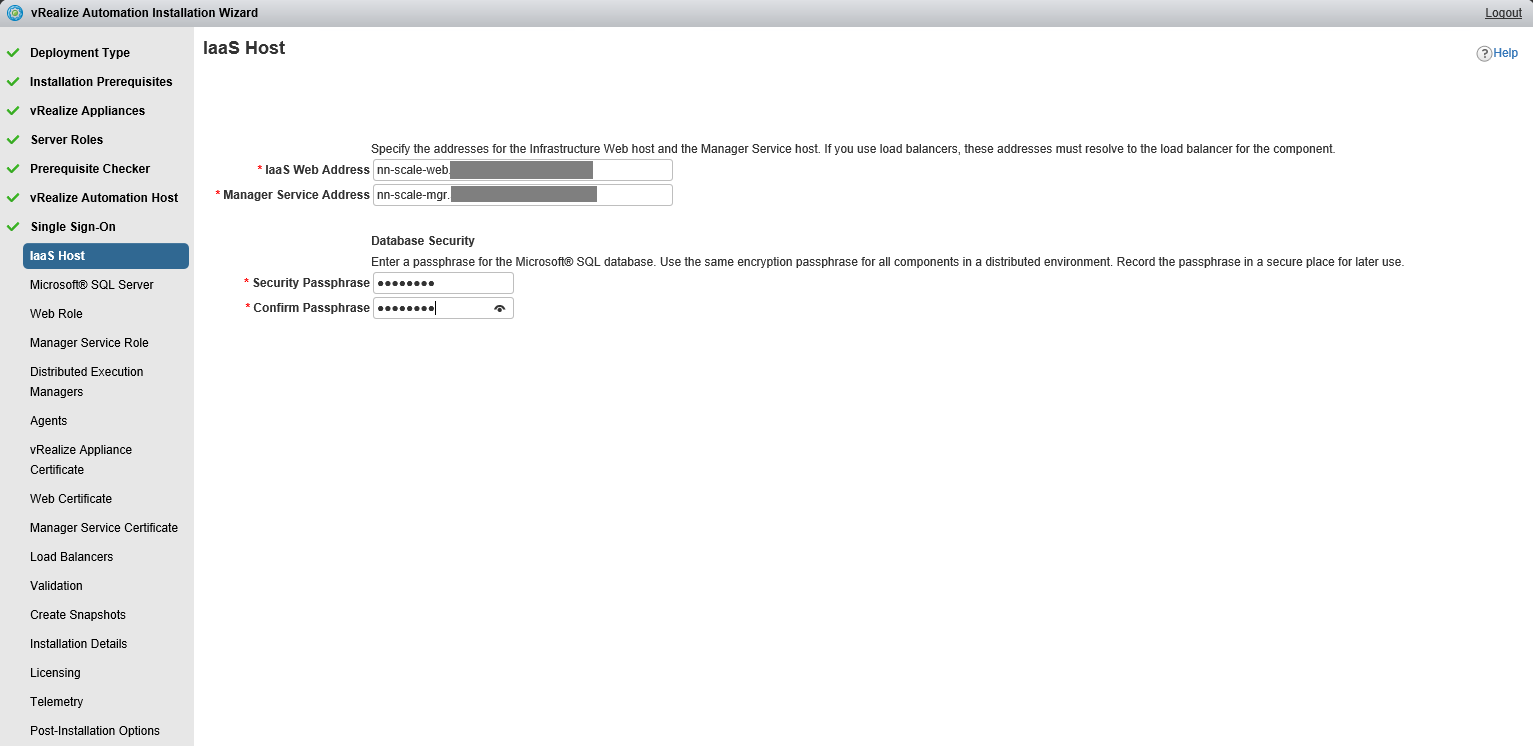
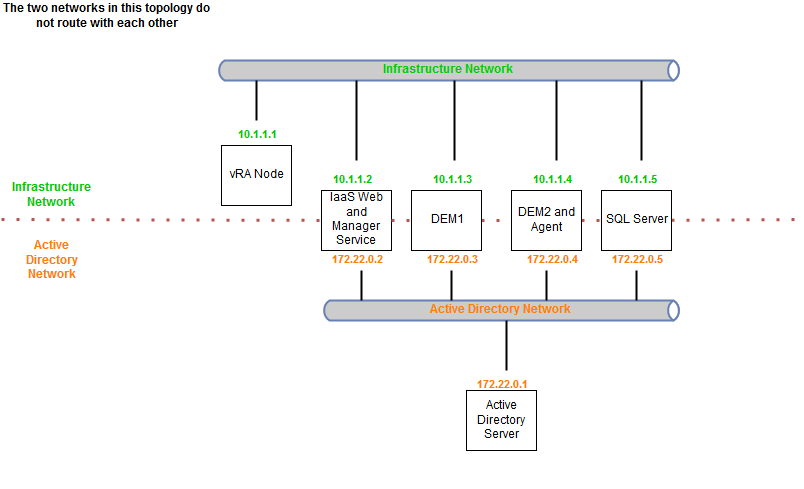
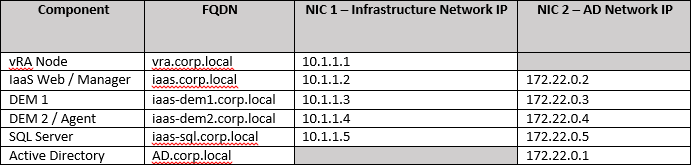
In order to better understand the references below here is a diagram of our vRA deployment


map0


Configuring Citrix NetScaler


  • Configure the NetScaler device

Enable the Load Balancer(LB) and SSL modules.

You can do so from the NetScaler > System > Settings > Configure Basic Features page.


  • Upload your certificate and private key

Go to NetScaler > Traffic Management > SSL > SSL Certificates

Click Install and upload your certificate chain + private key.


  • Configure monitors

Go to NetScaler > Traffic Management > Load Balancing > Monitors

Click Add and provide the required information. Leave the default when nothing is specified.


Add the following monitors:


Name Type Interval Timeout Send String Receive String Dest. Port Secure
vra_https_va_web HTTP 5 seconds 4990 milliseconds GET /vcac/services/api/
health
HTTP/1\.(0|1) (200|204) 443 yes
vra_https_iaas_web HTTP-ECV 5 seconds 4990 milliseconds GET /wapi/api/status/web REGISTERED 443 yes
vra_https_iaas_mgr HTTP-ECV 5 seconds 4990 milliseconds GET /VMPSProvision ProvisionService 443 yes


  • Configure service groups

Go to NetScaler > Traffic Management > Load Balancing > Service Groups 

Click Add and provide the required information. Leave the default when nothing is specified.

Enter each pool member as a Member and add it to the New Members type Server Based.


Add the following service groups:


Name Health Monitors Protocol SG Members Address Port
pl_vra-va-00_443 vra_https_va_web SSL ra-vra-va-01 10.23.90.223 443
ra-vra-va-02 10.23.90.224 443
pl_iaas-web-00_443 vra_https_iaas_web SSL ra-web-01 10.23.90.226 443
ra-web-02 10.23.90.227 443
pl_iaas-man-00_443 vra_https_iaas_mgr SSL ra-man-01 10.23.90.228 443
ra-man-02 10.23.90.229 443
pl_vra-va-00_8444 vra_https_va_web SSL ra-vra-va-01 10.23.90.223 8444
ra-vra-va-02 10.23.90.224 8444


  • Configure virtual servers

Go to NetScaler > Traffic Management > Load Balancing > Virtual Servers

Click Add and provide the required information. Leave the default when nothing is specified.


Add the following virtual servers:


Name Protocol Dest. Address Port Load Balancing Method Service Group Binding Certificate
vs_vra-va-00_443 SSL 10.23.89.101 443 Roundrobin pl_vra-va-00_443 Select the appropriate certificate
vs_web-00_443 SSL 10.23.89.102 443 Roundrobin pl_iaas-web-00_443 Select the appropriate certificate
vs_man-00_443 SSL 10.23.89.103 443 Roundrobin pl_iaas-man-00_443 Select the appropriate certificate
vs_vra-va-00_8444 SSL 10.23.89.101 8444 Roundrobin pl_vra-va-00_8444 Select the appropriate certificate


  • Configure Persistence Profile

Go to NetScaler and select NetScaler > Traffic Management > Load Balancing > Persistency Groups

Click Add and enter the name source_addr_vra then select Persistence > SOURCEIP from the drop-down menu.

Set the Timeout to 30 minutes.

Add all related Virtual Servers.

Click OK.


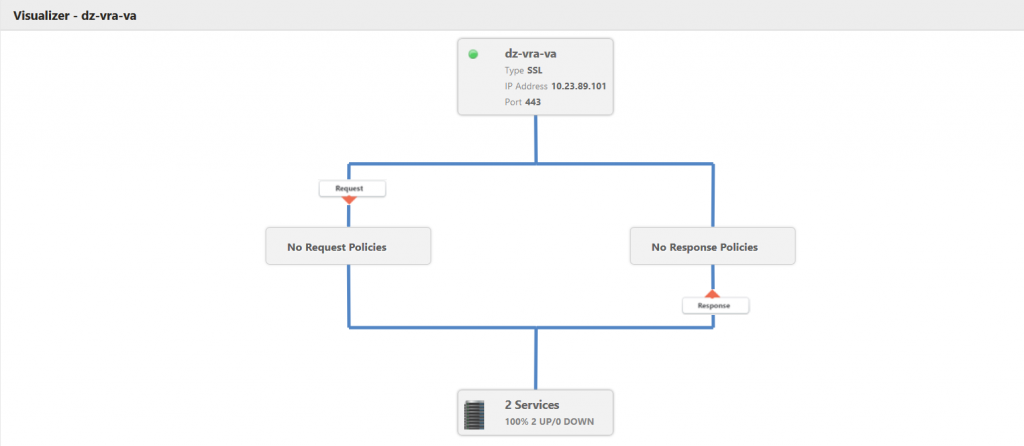
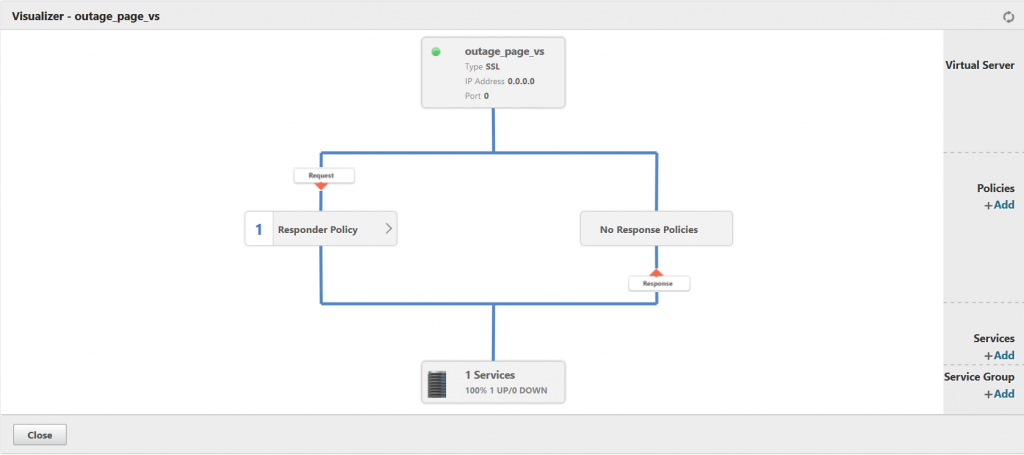
If everything is configured correctly you should see the following for every virtual server in LB Visualizer


map2


Configuring F5 BIG-IP


  • Upload certificate and key pair

Navigate to System > File Management > SSL Certificate List

Click Import and select the certificate chain + private key.

Input the same name for the certificate and the key that way the device will know which key to use for the certificate.


  • Configure SSL profile

Navigate to Local Traffic > Profiles > SSL > Client

Click Create

For Parent Profile select clientssl

Input Name – example vra_profile-client

Click the checkbox on Certificate, Chain, Key and select the correct certificate chain and key.


  • Configure custom persistence profile

Navigate to Local Traffic > Profiles > Persistence.

Click Create.

Enter the name source_addr_vra and select Source Address Affinity from the drop-down menu.

Enable Custom mode.

Set the Timeout to 1800 seconds (30 minutes).

Click Finished.


  • Configure monitors

Navigate to Local Traffic > Monitors.

Click Create and provide the required information. Leave the default when nothing is specified.


Create the following monitors:


Name Type Interval Timeout Send String Receive String Alias Service Port
vra_https_va_web HTTPS 3 10 GET /vcac/services/api/
health\r\n
HTTP/1\.(0|1) (200|204) 443
vra_https_iaas_web HTTPS 3 10 GET /wapi/api/status/web\r\n REGISTERED
vra_https_iaas_mgr HTTPS 3 10 GET /VMPSProvision\r\n ProvisionService


  • Configure pools

Navigate to Local Traffic > Pools.

Click Create and provide the required information. Leave the default when nothing is specified.

Enter each pool member as a New Node and add it to the New Members.


Create the following pools:


Name Health Monitors Load Balancing Method Node name Address Service Port
pl_vra-va-00_443 vra_https_va_web Round Robin ra-vra-va-01 10.26.90.223 443
ra-vra-va-02 10.26.90.224 443
pl_iaas-web-00_443 vra_https_iaas_web Round Robin ra-web-01 10.26.90.226 443
ra-web-02 10.26.90.227 443
pl_iaas-man-00_443 vra_https_iaas_mgr Round Robin ra-man-01 10.26.90.228 443
ra-man-02 10.26.90.229 443
pl_vra-va-00_8444 vra_https_va_web Round Robin ra-vra-va-01 10.26.90.223 8444
ra-vra-va-02 10.26.90.224 8444


  • Configure virtual servers

Navigate to Local Traffic > Virtual Servers.

Click Create and provide the required information. Leave the default when nothing is specified.


Create the following virtual servers:


Name Type Dest. Address Service port SSL profile (client) SSL Profile (Server) Source address translation Default pool Default persistence profile
vs_vra-va-00_443 Standard 10.26.89.101 443 vra-profile-client serverssl Auto Map pl_vra-va-00_443 source_addr_vra
vs_web-00_443 Standard 10.26.89.102 443 vra-profile-client serverssl Auto Map pl_iaas-web-00_443 source_addr_vra
vs_man-00_443 Standard 10.26.89.103 443 vra-profile-client serverssl Auto Map pl_iaas-man-00_443 None
vs_vra-va-00_8444 Standard 10.26.89.101 8444 vra-profile-client serverssl Auto Map pl_vra-va-00_8444 source_addr_vra


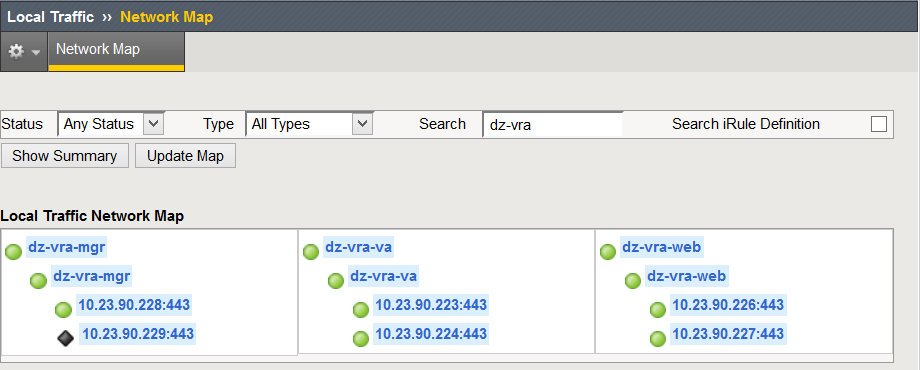
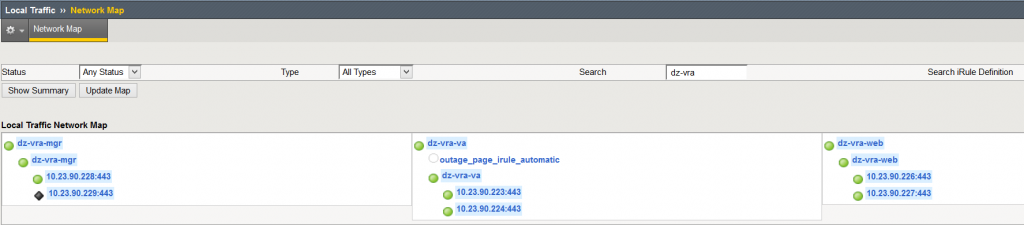
If everything is setup correctly you should see the following in Local Traffic › Network Map


map


Configuring VMware NSX


  • Configure Global Settings

Log in to the NSX, select the Manage tab, click Settings, and select Interfaces.

Double-click to select your Edge device from the list.

Click vNIC# for the external interface that hosts the VIP IP addresses and click the Edit icon.

Select the appropriate network range for the NSX Edge and click the Edit icon.

Add the IP addresses to be assigned to the VIPs, and click OK.

Click OK to exit the interface configuration subpage.


  • Enable load balancer functionality

Select the Load Balancer tab and click the Edit icon.

Select Enable Load Balancer, Enable Acceleration, and Logging, if required, and click OK.


  • Upload certificate chain and key

Go to Manage > Settings > Certificates and upload the certificate chain + private key


  • Add application profiles

Click Application Profiles on the window pane on the left.

Click the Add icon to create the Application Profiles required for vRealize Automation by using the information from the table below. Leave the default when nothing is specified.


Name Type Enable SSL Pass-through Configure Service Certificate Virtual Server Certificate Timeout Persistence
IaaS Manager HTTPS Deselected Selected Select the correct certificate None
IaaS Web HTTPS Deselected Selected Select the correct certificate 1800 seconds Source IP
vRealize Automation VA Web HTTPS Deselected Selected Select the correct certificate 1800 seconds Source IP


  • Add service monitors

Click Service Monitoring in the left pane.

Click the Add icon to create the Service Monitors required for vRealize Automation using the information from the table below. Leave the default when nothing is specified.


Name Interval Timeout Retries Type Method URL Receive Expected
vRealize Automation VA Web 3 10 3 HTTPS GET /vcac/services/api/health 200, 204
IaaS Web 3 10 3 HTTPS GET /wapi/api/status/web REGISTERED
IaaS Manager 3 10 3 HTTPS GET /VMPSProvision ProvisionService


  • Add pools

Click Pools in the left pane.

Click the Add icon to create the Pools required for vRealize Automation using the information from the table below. Leave the default when nothing is specified.

You can either use the IP address of the pool members, or select them as a Virtual Center Container.


Pool Name Algorithm Monitors Member Name Example IP Address / vCenter Container Port Monitor Port
pool_vra-va-web_443 Round Robin vRA VA Web vRA VA1 10.26.90.223 443
vRA VA2 10.26.90.224 443
pool_iaas-web_443 Round Robin  IaaS Web IaaS Web1 10.26.90.226 443
IaaS Web2 10.26.90.227 443
pool_iaas-manager_443 Round Robin IaaS Manager IaaS Man1 10.26.90.228 443
IaaS Man2 10.26.90.229 443
pool_vra-rconsole_8444 Round Robin vRA VA Web vRA VA1 10.26.90.223 8444 443
vRA VA2 10.26.90.224 8444 443


  • Add virtual servers

Click Virtual Servers on the left pane.

Click the Add icon to create the Virtual Servers required for vRealize Automation using the information from the table below. Leave the default when nothing is specified.


Name IP Address Protocol Port Default Pool Application Profile Application Rule
vs_vra-va-web_443 10.26.90.101 HTTPS 443 pool_vra-va-web_
443
vRA VA
vs_iaas-web_443 10.26.90.102 HTTPS 443 pool_iaas-web_
443
IaaS Web
vs_iaas-manager_443 10.26.90.103 HTTPS 443 pool_iaas-manager
_443
IaaS Manager
vs_vra-va-rconsole_8444


10.26.90.101 HTTPS 8444 pool_vra-rconsole
_8444
vRA VA


You can read more about the supported deployment scenarios for vRA in the official Load Balancing Guide which covers configuring vRA with the use of SSL pass-trough load-balancing.


In conclusion this guide is just scratching the surface of what you can accomplish by using SSL terminating ADC, but is good foundation on which you can build your complete integration.
If you are interested in more articles like this one stay tuned on VMware Blogs.


Take a vRealize Automation 7 Hands-On lab!

The post How to use vRealize Automation with SSL offloading in multi-arm load-balancing topology appeared first on VMware Cloud Management.


Create maintenance page for vRealize Automation

$
0
0

In my previous post I’ve showed you how to configure some of the most common ADCs in order to offload the SSL sessions for vRA. Now I am going to show you how you can use some of the benefits that come with SSL termination.
One of this benefits is the ability to serve content directly from the ADC based on some logic. The goal of this post is to help you configure “Outage page” and “Maintenance page” for your vRA environment. You can use only one of the pages or both together. I am going to cover the configuration of F5 BIGIP and Citrix NetScaler.

Maintenance page – this page will be assigned manually during maintenance activities and will inform the users that planned maintenance is being performed. It also allows you to exclude IP ranges from the redirect rule.

Outage page – this page will be always assigned and in case all of the vRA appliances are down it will show a page informing the users that vRA is not available


As a general precaution test this procedure in your lab and deploy it in production at your own risk.


Citrix NetScaler


Create Responder Actions


First we need to create our Responder Actions so the LB can serve HTML pages

Head to NetScaler > AppExpert > Responder > Responder Actions


For our Outage page
Add new action with the following parameters:

Name: outage_page_action
Type: Respond with HTML page
HTML page: [Import your html page here, see below for example]
Response status code: 503


For our Maintenance page
Add new action with the following parameters:

Name: maintenance_page_action
Type: Respond with HTML page
HTML page: [Import your html page here, see below for example]
Response status code: 503


Example: Outage HTML page with refresh every 10 seconds


<!doctype html>
<title>Something went wrong</title>
<meta http-equiv="refresh" content="10">
<style>
  body { text-align: center; padding: 150px; }
  h1 { font-size: 50px; }
  body { font: 20px Helvetica, sans-serif; color: #333; }
  article { display: block; text-align: left; width: 650px; margin: 0 auto; }
  a { color: #dc8100; text-decoration: none; }
  a:hover { color: #333; text-decoration: none; }
</style>
<article>
    <h1>Something went wrong</h1>
    <div>
        <p>Sorry for the inconvenience but vRA is not accessible at the moment.
           Please report this error to  test@test.email.</p>
        <p>The Team</p>
    </div>

Example: Maintenance HTML page with refresh every 10 seconds


<!doctype html>
<title>Site maintenance</title>
<meta http-equiv="refresh" content="10">
<style>
  body { text-align: center; padding: 150px; }
  h1 { font-size: 50px; }
  body { font: 20px Helvetica, sans-serif; color: #333; }
  article { display: block; text-align: left; width: 650px; margin: 0 auto; }
  a { color: #dc8100; text-decoration: none; }
  a:hover { color: #333; text-decoration: none; }
</style>
<article>
<h1>We will be back soon!</h1>
    <div>
        <p>Sorry for the inconvenience but we are performing some maintenance at the moment.
           If you need to you can always contact us at test@test.email, otherwise we will be back online shortly!</p>
        <p>The Team</p>
    </div>


Create Responder Policies


After we have our actions in place we need to create policies using them

Head to NetScaler > AppExpert > Responder > Responder Policies


For our Outage page

Add new Responder Policy with the following attributes:

Name: outage_page_action_policy
Action: outage_page_action
Expression: TRUE


For our Maintenance page

During planned maintenance we need to show the maintenance page to our end users, but we also need to make sure that the vRA systems can communicate with each other.
That is why we need to create an expression which contains all the IP addresses of our vRA components – IaaS Managers, IaaS Web, vRA appliances and others. Those addresses will not be redirected to the maintenance page.
You can also add the IP addresses or subnets from which the vRA admins are connecting to vRA, that way they can test and debug during maintenance.

Add new Responder Policy with the following attributes:

Name: maintenance_page_action_policy
Action: maintenance_page_action
Expression: CLIENT.IP.SRC.IN_SUBNET(10.23.90.0/24).NOT||CLIENT.IP.SRC.IN_SUBNET(10.23.89.0/24).NOT

Alternatively if you want to list specific IP addresses you can use CLIENT.IP.SRC.NE(10.23.89.101)||CLIENT.IP.SRC.NE(10.23.90.223) and so on.


Create dummy Service


(Required only for the Outage page)


We need to create dummy Service and ensure that it will always be up.
You can assign any back-end IP to it since you will never be redirected to that IP.
Just make sure you are not assigning IP that you might disable later on.

Head to NetScaler > Traffic Management > Load Balancing > Services
Add
new service with the following attributes:

Name: outage_page_srv
IP address: 1.1.1.1 (or anything else, this one is not vital)
Protocol: SSL
Port: 443
Health monitoring: Off


Create dummy Virtual Server


(Required only for the Outage page)


Now we need to create dummy Virtual Server.
You do need an IP address for this one as it won`t be directly addressable.

Head to NetScaler > Traffic Management > Load Balancing > Virtual Servers
Add
new virtual server with the following attributes:

Name: outage_page_vs
Protocol: SSL
IP address type: Non addressable
Service binding: outage_page_srv
Server certificates: Select your vRA certificate+key pair
Add Policy: Responder
Add Policy type: Request
Policy name: outage_page_action_policy


Here is the mapping:

maint_page_vs


Assign the Outage page VS to the vRA virtual appliances VS


(Required only for the Outage page)


Now we need to assign the Outage page VS as a backup for our vRA virtual appliances VS.
That way when the vRA virtual appliances are down the user will see our outage page.

Head to NetScaler > Traffic Management > Load Balancing > Virtual Servers
Edit
your vRA VA VS – vs_vra-va-00_443 (I used that name in my previous post, yours might differ)

Click on the + Protection button from the left panel and enter the following info:

Backup virtual server: outage_page_vs


During maintenance: Assign the Maintenance page policy to the vRA virtual appliances VS


To redirect our users to the maintenance page during planned activities we need to assign the maintenance policy to our vRA VA VS.

Head to NetScaler > Traffic Management > Load Balancing > Virtual Servers
Edit
your vRA VA VS – vs_vra-va-00_443 (I used that name in my previous post, yours might differ)

Click on the +Policies button from the left panel and enter the following:

Policy: Responder
Type: Request
Policy name: maintenance_page_action_policy

Note that the best practice during maintenance is to disable all related ADC monitors. If those are not disabled the ADC will serve the Outage page instead.
After your planned activities are over, follow the same procedure and remove the Policy from the Virtual Server.


F5 BIGIP LTM


Create Data Group


(Required only for the Maintenance page)


During planned maintenance we need to show the maintenance page to our end users, but we also need to make sure that the vRA systems can communicate with each other.
That is why we need to create a data group which contains all the IP addresses of our vRA components – IaaS Managers, IaaS Web, vRA appliances and others. Those addresses will not be redirected to the maintenance page.
You can also add the IP addresses or subnets from which the vRA admins are connecting to vRA, that way they can test and debug during maintenance.

Go to Local Traffic  >  iRules : Data Group List

Create a Data Group with name vRA_addresses (important we use this exact name later on in our iRule, if you want to use different name change it there as well) and populate it with the IP addresses of every vRA component.


Create iRules


First we need to create new iRule for the outage page which will be shown in case of unexpected failure.
Note the HTML is embedded in the iRule so feel free to modify it.

Go to Local Traffic  >  iRules : iRule List 


Create an iRule with name outage_page_irule_automatic

Paste the following in Definition:

when RULE_INIT {
    # sets the timer to return client to host URL
    set static::stime 10
}

when CLIENT_ACCEPTED {
    set default_pool [LB::server pool]
}


when HTTP_REQUEST {
   # If the default pool is down, redirect to the maintenance page
   if { [active_members $default_pool] < 1 } {
         # Send an HTTP 503 response with a Javascript meta-refresh pointing to the host using a refresh time
         HTTP::respond 503 content \
"<!doctype html><title>Something went wrong</title> \
<meta http-equiv='REFRESH' content=$static::stime;url=[HTTP::uri]> \
<style>  \
body { text-align: center; padding: 150px; }  \
h1 { font-size: 50px; }
body { font: 20px Helvetica, sans-serif; color: #333; }  \
article { display: block; text-align: left; width: 650px; margin: 0 auto; }  \
a { color: #dc8100; text-decoration: none; }\
  a:hover { color: #333; text-decoration: none; }\
</style>\

<article>\
    <h1>Something went wrong</h1> \
    <div> \
        <p>Sorry for the inconvenience but vRA is not accessible at the moment. \
           Please report this error to  test@test.email.</p> \
        <p>The Team</p> \
    </div>" "Content-Type" "text/html"
      return
   }
}


Now let’s create the iRule which you will assign during planned maintenance


Create an iRule with name maintenance_page_irule_manual


when HTTP_REQUEST {
    # Do not show to the vRA components
 if { ! [class match [IP::client_addr] equals vRA_addresses] } {
   # Always show the maintenance page
    HTTP::respond 503 content \
"<!doctype html><title>Site Maintenance</title> \
<meta http-equiv='REFRESH' content=$static::stime;url=[HTTP::uri]> \
<style>  \
body { text-align: center; padding: 150px; }  \
h1 { font-size: 50px; }
body { font: 20px Helvetica, sans-serif; color: #333; }  \
article { display: block; text-align: left; width: 650px; margin: 0 auto; }  \
a { color: #dc8100; text-decoration: none; }\
  a:hover { color: #333; text-decoration: none; }\
</style>\
<article>\
    <h1>We will be back soon!</h1> \
    <div> \
        <p>Sorry for the inconvenience but we are performing some maintenance at the moment. \
           If you need to you can always contact us at test@test.email, otherwise we will be back online shortly!</p> \
        <p>The Team</p> \
    </div>" "Content-Type" "text/html"
      return
}
}


Bind the automatic outage page to our vRA virtual appliances VS


(Required only for the Outage page)


Now we need to edit our vRA appliances VS, assign HTTP profile to it and bind the iRule.

Go to Local Traffic  >  Virtual Servers : Virtual Server List and find your vRA appliances VS.
(In my previous post I have named it vs_vra-va-00_443 yours however may differ)

Click Edit and set the following attributes:

HTTP Profile Client: http
HTTP Profile Server: (Use Client Profile)

Click Update

Now click on the Resources tab and in the iRules section choose iRule outage_page_irule_automatic

Click Update again


Here how the mapping should look like:

maint_page_map_f5


During maintenance: Bind the planned maintenance page to our vRA virtual appliances VS


During planned maintenance, we need to change the iRule so we can make sure that the maintenance page is displayed to our end users, but the vRA components can still communicate.

Go to Local Traffic  >  Virtual Servers : Virtual Server List and find your vRA appliances VS.
(In my previous post I have named it vs_vra-va-00_443 yours however may differ.)

Click Edit and go to Resources find iRule outage_page_irule_automatic  and change it with maintenance_page_irule_manual.
Click Update and you are ready.

Note that the best practice during maintenance is to disable all related ADC monitors. If those are not disabled the ADC will serve the Outage page instead.
After your planned activities are over, follow the same procedure and assign the outage_page_irule_automatic iRule.


If you are interested in more articles like this one stay tuned on VMware Blogs.

Take a vRealize Automation 7 Hands-On lab!

The post Create maintenance page for vRealize Automation appeared first on VMware Cloud Management.

March 15th: Getting Started with IT Automation and Self Service Provisioning

$
0
0

On Wednesday March 15th, we will be hosting another “Getting More out of VMware” webinar. Continuing on our theme of automating the SDDC, we will show you how to get started with with IT automation and self service provisioning using vRealize Automation 7.2.
Register below, or read for more details!

IT Automation provisioning


This webinar is for the practitioners involved in managing IT infrastructure and virtual environments who need to be able to understand how to automate IT service provisioning requests, or provide an Automated Self Service Catalog to their end users.

Presenters:
Ryan Kelly, Staff Systems Engineer, VMware

During this session we will show you how to get vRealize Automation installed, configured and up and running so you can begin to publish and provision blueprints.

vRealize Automation Overview and Installation

We will star by providing a brief overview of the product, and the architectures. We will also show an overview of the Wizard based installer, and will go over a number of environmental settings and best practices for specific use cases.


IT_automation1

Demonstration of vRealize Automation base setup

We will demonstrate the steps required to configure vRealize Automation after the wizard based installer finishes so you can begin to build reservations and blueprints.


IT_automation2


We will also spend some time demonstrating how to create, publish, entitle and provision your first blueprint. There will be helpful tips along the way for troubleshooting as well as some helpful links to brand and personalize your service catalog.

At the end of the session, my colleagues and I will run a special Q&A session, so come prepared with your questions! Looking forward to see you at the webinar.


IT_automation3


Live Q&A in the End: Bring your Questions!

The webinar will conclude with an open live Q&A with our specialists who will be on hand to answer your questions through chat.

The post March 15th: Getting Started with IT Automation and Self Service Provisioning appeared first on VMware Cloud Management.

Managing the SDDC with the vRealize Code Stream Management Pack for IT DevOps

$
0
0

The SDDC Object Lifecycle

Within the Software Defined Data Center, or SDDC, all things are naturally becoming software defined. This includes not just our virtualized infrastructure, but all of the policy-based management and automation tools that are used to enable a hybrid cloud. Each of these tools have their own configurations which help to define and manage your SDDC. Those configurations, which essentially define the SDDC, have their own lifecycle as well. This begs the question, what’s the most effective way to manage the lifecycle of these SDDC objects?

Infrastructure as Code with vRCS Managment Pack for IT DevOps 2.2

If you’ve deployed tools like vSphere, vRealize Operations, vRealize Automation, vRealize Code Stream, vRealize Orchestrator, and so on, then you likely understand the importance of the objects that you manage within these tools. Dashboards, Reports, Blueprints, Templates, Properties, Pipelines, Workflows – each of them being extremely important in defining how you manage your SDDC. However, each one of these objects requires its own level of management. Initially, one can easily create something and begin getting value out of the automation and abstraction that it provides. Over time as the number of objects increases, the need to maintain a common library of these objects and configurations becomes critical.

In addition, when managing multiple environments and / or multiple tenants, a lot of manual effort can be required in order to ensure the objects within these environments are consistent, while preserving a single source of truth. In addition, over time, it also becomes very important to preserve a historical record of all of the changes and updates made to these various objects and configurations.

With the vRealize Code Stream Management Pack for IT DevOps, performing all of these tasks becomes trivial.

What It Does

First, it provides the ability to capture and maintain a centralized repository of every single supported object and configuration. They can then be compared, rolled back, and deployed to other environments and tenants.

Secondly, it provides a mechanism for having a centralized “gold” configuration or environment, which in turn can be used to synchronize other tenants and / or environments. What previously would have involved significant manual effort can now be performed in only a few clicks. Plus, deployments can be automatically tested prior to being deployed onto production environments, and easily rolled back if necessary.

And finally, all of this is done while leveraging existing vRealize tools. Because of this, we can leverage the same approvals engine, workflows, pipelines, and overall infrastructure that is overseeing the SDDC.

See It In Action!

Want to port vRealize Automation blueprints across tenants and / or other environments? See this overview video:

Want to capture, version, and redeploy vRealize Operations Reports? The following video provides an overview:

Learn More

To learn more, check out the vRealize Code Stream page on vmware.com: http://www.vmware.com/products/vrealize-code-stream.html. And for more videos, be sure to check out our playlist on YouTube: https://www.youtube.com/watch?v=R_fP-Y9Tx2U&list=PLrFo2o1FG9n5zMaCJMIwNdEog6zRpyrj7.

The post Managing the SDDC with the vRealize Code Stream Management Pack for IT DevOps appeared first on VMware Cloud Management.

Hybrid Cloud Assessment Launched!

$
0
0

Hybrid Cloud Assessment (HCA)

Hybrid Cloud Assessment answers your cloud cost questions in less than 3 hours. HCA helps to understand existing private cloud costs, compares public and private cloud costs and enables IT teams to confidently share information on actual costs with their lines of business. You get a report after you run the Hybrid Cloud Assessment.


Why take Hybrid Cloud Assessment (HCA)?

  • Gain Insight into Existing Cloud Costs: Easily understand the cost of your existing private cloud infrastructure. Quickly assess business spending across multiple public cloud accounts and providers.
  • Speed Decision Making: On-Premises or Cloud?: Make informed purchasing decisions by quickly comparing private and public cloud costs. Save time in workload run discussions using capacity comparison and ”what if” scenarios.
  • Uncover Cost-Saving Opportunities: Reduce public and private cloud deployment costs. Identify reclamation cost savings by performing HCA with VOA (vSphere Optimization assessment)
  • Share Data with Confidence: Establish IT as strategic business partner by sharing actual costs with line-of-business leaders. Quantify cloud consumption across business groups, applications, and services.

The HCA report compares the vSphere private cloud vs aws, azure public cloud costs, deep dive analysis on private cloud infrastructure costs such as VM count, average VM costs, etc., shows the actual cost across different line of businesses as showback statement and identifies reclamation cost savings oppurtunities for your private cloud.

HCA report is generated from real world customer data center information using VMware vRealize®. What’s great about HCA is that you can demonstrate the immediate value of our vRealize Business for Cloud solution so customers can make more informed buying decisions about VMware IT management solutions. HCA is a great candidate to initiate cloud journey conversations with your customers. Less than 3 hours! That’s how long a Hybrid Cloud Assessment takes.


Completing a Hybrid Cloud Assessment with VMware is easy. Simply submit the form and a cloud expert will contact you.

Get your HCA Report today!

The post Hybrid Cloud Assessment Launched! appeared first on VMware Cloud Management.

Silent Installation of vRA 7.2 – A How To Guide

$
0
0

Silent Installation of vRA 7.2 – A How To Guide

Lately, I’ve realized many of my colleagues at VMware and none of my customers are aware that vRealize Automation (vRA) provides a silent method for installation. With the release of vRA 7.2 two really cool features were the silent installation of the Management agent and the silent installation of vRA. There are a lot of pros and cons associated with the silent installation of vRA, but in this article I want to show you how easy and fast it is. For the silent installation of the Management agent, I have one word: COOL! It’s easy to install, very fast and the biggest benefit of all is the ability to use it over and over again. Once you have edited the PowerShell script with the correct properties (like vRA host name, user name and password), you can use it multiple times with different releases, this means there is no need for future downloads, all you need is to run it against the new vRA appliance. In this blog post, I will show you how to install vRA 7.2 in high availability mode using both silent installers.

Before starting with the installation of vRA 7.2 please check the Prerequisites page of the vRA Informaiton Center

If you haven’t downloaded vRA 7.2 yet, visit the vRA download page


Management Agent Silent Installation

In the following steps, I will show you how to use the silent installation of the vRA Management Agent:

  • Download the PowerShell script from the appliance downloading page– https://<vRA01-fqdn>:5480/installer ; The downloaded file has the name InstallManagementAgent.ps1

  • Edit the PowerShell script InstallManagementAgent.ps1, where you type
    1. the vRA VA01 FQDN in the following format https://<FQDN-va01>:5480,
    2. the user name and password of the service user, used for the IaaS components installation; NOTE: if you are using a domain user, don’t forget to add the domain name in following format <domain name>\username
    3. password for the vRA VA root user
    4. user name for the vRA VA root user
    5. TIP: You can leave the Certificate Thumbprint blank. If you leave it blank you can use the same script with different deployments of vRA without changing the properties, just run the script against the new appliance and thumbprint will be populated automatically.

  • Copy the edited PowerShell script to all IaaS Windows machines
  • Run PowerShell console as Administrator and navigate to the folder with the PS script
  • Run the script

The Management Agent should be successfully installed and the IaaS instance should be displayed in the vRA Installation Wizard. If you don’t want to use the Installation wizard, you can also use SSH connection to the vRA master node and list all registered nodes using this command: vra-command list-nodes


vRealize Automation silent installation

Now you can proceed with the installation of vRA. An alternative way of installing vRA is in a silent mode. This method is easy and fast. If the installation fails for any reason, you just use the same properties file instead of re-populating all the fields in the installation wizard. The silent installation also uses several types of validations. First it validates all the properties in the properties file, then it validates the connection to all appliances and IaaS machines, as well as all SQL servers and NTP servers. After that it checks the connectivity to all Management Agents and the offset to the NTP server. Finally it validates all user names and passwords to all VMs included in the installation.  As you may have guessed, this installation is fully command line, so the only disadvantage is that if you receive any errors during the validation they are displayed in the command line or in the installation log-file. There is no fancy UI like you see with the Installation wizard. The main advantage of this silent installer is that it is much faster than the wizard. It is worth it to try it out. Below I will show you how to install your vRA using this new silent installer. Here are the steps:

  • Open a SSH connection to the vRA appliance 1
  • Go to /usr/lib/vcac/tools/install
  • Open ha.properties files and edit it
  • Accept the EULA; type certificate name, unit and code if you want to generate your self-signed certificates during the installation
  • Type the vRA 7.x license

  • Provide the NTP server if you want to use any, separated by a space
  • Select whether you want to install the IaaS components or not by setting INSTALL_IAAS=True
  • Select whether you want to use single IaaS credentials, meaning the same domain user on all Windows machines. If you set this property to True, you don’t need to provide the credentials for the other IaaS components, just leave them blank.
  • Provide the credentials for the single solution user. Note: make sure that this solution user has sufficient privileges to perform the installation on all Windows VMs
  • Provide values for the following vIDM properties:
    1. HORIZONUSER – this is the vIDM tenant administrator of the default tenant, we recommend leaving the default value which is ‘administrator’
    2. HORIZONPASS – this is the vIDM tenant administrator’s password
    3. SSO_TENANT – this is the default tenant, we recommend leaving it as the default

  • Specify the FQDNs of all additional appliances, separated by space
  • Provide the root user name and password for each additional appliance
  • Specify the FQDNs of all IaaS web nodes separated by space
    Note: if you install vRA in single mode, this will be the VM where you install all IaaS components – Web, Manager Service, DEM and Agent
  • Provide the credentials for the web nodes
    Note: If you have opted to use a single solution user, then leave user name and password properties blank

  • Specify the FQDNs of all IaaS manager service nodes separated by space. DEO (DEM orchestrator) will be installed on this node as well
  • Provide the credentials for the web nodes
    Note: If you have opted to use a single solution user, then leave user name and password properties blank
  • Specify the FQDNs of all IaaS DEM worker nodes separated by space
  • Provide the credentials for the web nodes
    Note: If you have opted to use a single solution user, then leave user name and password properties blank

  • Provide the Load balancer FQDNs where:
    1. vRA_LB_FQDN – is the vRA VA VIP
    2. vRA_WEB_FQDN – is the vRA Web VIP
    3. vRA_MS_FQDN – is the vRA MS VIP

  • Provide the MSSQL server hostname.
  • If you have multiple instances in this MSSQL server provide the instance where the VCAC database should be created
  • Provide a name for the IaaS database
  • Specify if you want to use Windows authentication or not. Make sure that if you select the use the Windows authentication, the user used for the installation of the other IaaS components has sufficient administrative privileges on the MSSQL server VM, as well as privileges to create a database in the SQL server
  • Specify whether to use encryption or not
  • Specify if you want to use Windows authentication or not. Make sure that if you select the use the Windows authentication, the user used for the installation of the other IaaS components has sufficient administrative privileges on the MSSQL server VM, as well as privileges to create a database in the SQL server
  • If you don’t use the Windows authentication, provide credentials for the MSSQL user
  • Select USE_EXISTING_DATABASE=’False’  to create a new database
  • Select the IaaS database passphrase

  • Leave the web site name and port with their default values
  • Specify the FQDN of all VMs where the agents will be installed, separated by space
  • Provide user name and password for all agents VMs.
    Note: If you have opted to use a single solution user, then leave user name and password properties blank
  • Provide the vSphere agent names separated by space. For better failover protection we usually recommend installing the vSphere agents with the same name on different VMs . This way if one of the agents stops working, the data collection will continue working, using the agent installed on the other VM
  • Provide the vSphere endpoints name. The number of endpoints should match the number of vSphere agents, and each failover pair agent/endpoint should have identical names. In case you install multiple agents with different names connected to different vSphere endpoints, we recommend using pairs with the same names for the agent and endpoint-
    e.g. if you have two endpoints vsphere1.vmware.com and vsphere2.vmware.com it is best name the agents with the same names – vsphere1.vmware.com and vsphere2.vmware.com to prevent any collision of the the agents

  • Repeat steps 32 and 33 for all other agent types
  • Set APPLY_FIXES=’True’ if you want to run the prerequisite checker. This checker will check if all requirements on the IaaS nodes are met and if they are not met will run the fixer. So I would recommend to select it.
  • Select CREATE_INITIAL_CONTENT if you want to create a basic POC content on the new system
  • Provide a CONFIGURATION_ADMINISTRATOR_PASSWORD for the initial content
  • Safe and close the ha.properties file
  • Before running the installation there are two very important steps, that you shouldn’t miss:
    1. Create snapshots of all VMs – vRA appliances and IaaS Nodes
    2. If you install your vRA in a high availability mode, prepare the load balancer, where you create the pools, add the nodes to the appropriate pool and create the VIPs. Make sure that all secondary nodes are disabled in the pools, if you are using F5 you should force them offline instead of just disabling them. In each pool, use a simple ICMP monitor and make sure that all enabled nodes are green.

  • Now you are ready for install. Run the vra-ha-config.sh file

If the silent installation completes successfully you will see the following message:


If your session has expired, or you have closed your SSH window you can find the installation execution in the following installation file – vra-ha-config.log in folder /var/log/vmware/vcac . You can also check the vcac-config.log file

You can now continue with the post installation tasks and described in the vRealize Automation official documentation

If you are interested in what’s new in vRA 7.2 please check the vRA 7.2 release notes

Here is a high-level blog on the release of vRA 7.2, including any new features.

Visit this blog for a detailed implementation video on vRA 7.2

The post Silent Installation of vRA 7.2 – A How To Guide appeared first on VMware Cloud Management.

SDDC Meets CMBU – Makes Great Cava

$
0
0

Engineers are expensive, and we need to maximize their value.  

It takes hours when engineers need to stand up an instance of vRealize Automation for bug reproduction, testing, or development work. Those are hours that they can’t spend writing new features, testing features, and developing whitepapers or resolving customer issues. The list of valuable things those engineers could be doing goes on and on.

Adding to this, is the complexity of any modern IT infrastructure with multiple vCenter servers, which could be across the globe. The workload needs to be balanced for optimal workload performance.  NSX helps to accomplish by automating network provisioning, adding more options for engineers as consumers to choose from when they provision a VM.  We need a tool that positions the workload in the right place to maximize the value of virtualization by applying policies to the multitude of choices available.

The Cloud Management Business Unit (CMBU) needed automation!

Using our own products has been fundamental to automating our own development processes and improving how we work, in addition to eating our own cooking. “Project Cava” is the internal name for this project. With Project Cava, we’re able to manage the largest of the CMBU’s global labs from a single place, automate the placement and provisioning of complex workloads, and provide monitoring and showback of those resources to the CMBU.

With vRealize Automation as the main piece of the equation, we’re able to automate the provisioning of vRealize Automation builds from our build farm all the way through loading them into vCenter, deploying the machines, performing initial configuration, and even loading test data sets. This frees up about four hours of engineer working time for every time an instance of vRealize Automation needs to be deployed. Wait time is even further reduced down to an hour for the process to complete.

To achieve this, we use custom workflows in vRealize Orchestrator to move the build from the build farm to the correct vCenter server based on our pre-built policies. This workflow also updates properties on the requests. Once the build is uploaded, vRealize Automation clones the virtual machines and uses software components to perform the initial configuration and load test data based on the scenario that has been chosen at the request time.

SDDC Meets CMBU - Makes Great Cava - Cloud Automation Engineering - VMware Core Confluence 2017-03-13 19-13-37

Interaction flow throughout pipeline

Automation Delivers Results.

Within the CMBU, Cava is managing five data centers: two in the USA, one in India, one in Bulgaria, and one in Ireland.  This lets our users choose from a single portal where their workload gets deployed geographically. The vCenter server, network, and datastore are all abstracted from that choice.  vRealize Automation allows these decisions to be made based on policy so that the workload always ends up on the right hardware. This lets developers focus on adding value in the way they should be, rather than trying to figure out which vCenter server they want to be in or which datastore and/or network they can use. Now Engineers only have to know what they need and where they need it. Workload optimization is automatically taken care of for them.

Bringing Cava to the CMBU

We are developing on our products all the time. When we have an internal builds complete for vRealize Operations, vRealize Business for Cloud, and vRealize Automation we are able to bring these latest capabilities to the platform in a rapid and repeatable fashion. We’re upgrading our Software-defined Data Center (SDDC) every month with the latest and greatest that VMware has to offer. This means that we’re developing end-to-end use cases at the same time the features are undergoing heavy development. This has resulted in feature improvements and a rich backlog of features and functions based on real world use of vRealize Suite in the CMBU.

To date, we manage 3000 VMs with a weekly churn of 200-400 VMs to serve the Engineering, Product Management, Professional Services, and Global Services teams connected with vRealize Automation. This year, we’re expanding this to the full CMBU, so the teams building vRealize Operations and vRealize Business for Cloud will be able to reduce developer friction with their infrastructure and get more value out of their engineering teams.

Customers love Cava too.

When we meet with customers with larger deployments, they’re thrilled about what they can do with vRealize Automation. Additionally customers are excited to see how VMware has managed to streamline their operations by using the vRealize stack on top of vCenter and NSX. Customers also want to know how to automate the deployment of vRealize Automation so they can adopt a DevOps philosophy around their own use of vRealize Automation for workflow and blueprint development as an alternative to having a fixed “dev” deployment of vRealize Automation that must be shared.  We’re in the middle of a beta program for the automated deployment blueprint with one of those customers and receiving great feedback. Stay tuned and we should have a packaged blueprint available for download soon!

The post SDDC Meets CMBU – Makes Great Cava appeared first on VMware Cloud Management.

Troubleshooting vRealize Automation and MS DTC

$
0
0

An often-overlooked component of the vRA IaaS infrastructure is the Microsoft Distributed Transaction Coordinator (MS DTC). This blog deals with common problems and troubleshooting techniques specifically targeting vRA. In my line of work, I often see that different organizations have different security and configuration standards. vRA has some strict DTC requirements, which ensure that all components will work, but many of you may require stricter security and non-standard configurations. Moreover, once the configuration process deters from the well-trodden trail, scary long-legged problems arise, strange things happen and the more you try to resolve them the messier it gets. Suddenly, the whole situation resembles a dark and scary world from a sci-fi TV series. Welcome to the Upside Down.

Symptoms

How do we know that there’s something wrong with MS DTC? I know that something’s not right when I go to the infrastructure tab of the Automation Console and see ugly messages like these:

ms dtc errors

These messages come from the Manager Service complaining about having trouble with executing queries. If you log onto the Manager server and open the All.log file, you will see a message not quite different from this one:

“System.ApplicationException: Error executing query usp_SelectAgent  —> System.ApplicationException: Error executing query usp_SelectAgentCapabilities  —> System.Transactions.TransactionManagerCommunicationException: Communication with the underlying transaction manager has failed. —> System.Runtime.InteropServices.COMException: The MSDTC transaction manager was unable to pull the transaction from the source transaction manager due to communication problems. Possible causes are: a firewall is present and it doesn’t have an exception for the MSDTC process, the two machines cannot find each other by their NetBIOS names, or the support for network transactions is not enabled for one of the two transaction managers. (Exception from HRESULT: 0x8004D02B)”

The real error message is a little longer, but I’ll spare you a few lines of .NET stack trace mumbo-jumbo for the sake of brevity and to-the-point style of writing. Of course, the average systems administrator would just attempt to restart the Manager Service in a hope that maybe the service went berserk. Trust me, I also do it. Sometimes even repeat it once or twice while mumbling voodoo spells and blowing magical dust, but more often than not it does not help. Once you’ve made sure it’s not something intermittent you can take a closer look at the message which clearly states the MS DTC manager was unable to pull a transaction. This means we’ve got an “uh-oh” situation with the DTC on either the Manager server or the SQL server.  Or both (scary).


Troubleshooting

  • The Service should be running and its settings should look the same as on this picture:ms dtc service options

I should mention something important here – the service should always, always run with the Network Service account. Some organizations love to mess with the service accounts in order to strengthen security, but Network Service is an account that has been stripped of all redundant roles and privileges and has just the minimum needed to properly run services. If you don’t trust me, ask Microsoft.

  • NetBIOS – check your DNS and WINS resolution, both forward and reverse. If it doesn’t work, then this might be the reason for your problems.
  • Firewall. In the age of Twitter nobody reads past the 140th character, but if you take a closer look at the error message you’ll see a suggestion. It says you should revisit your firewall settings. For strange or legacy reasons the DTC relies on RPC.  There is one rule that needs to be configured on the Windows Firewall for both inbound and outbound communications – Distributed Transaction Coordinator (TCP-Out). If you don’t have it predefined just click on New Rule and type the path to the program you want to allow – %SystemRoot%\system32\msdtc.exe.ms dtc firewall options

    Don’t forget to open port 135 alongside all the ports between 1024 and 65535 because once a session is successfully established on 135, the communication continues over a random port.  You can limit these ports. On a side note, there are two other inbound rules regarding DTC that you can configure, but both of them allow the DTC service management through RPC and are not directly related to the workings of the Manager Service.

  • DTC Trace log. Very often, reading this log will help you find a solution to your problems. In order to read the DTC log you will need a special tool called tracefmt.exe, which you can find on the Windows Driver Kit. Just make sure you get the 64bit version. Copy this tool to C:\Windows\System32\MsDtc\Trace on the Manager server, but do it with the Command Prompt. Don’t try to mess with the folder’s permission by going there with Windows Explorer. Now, restart the DTC service so you have a clean start and issue the following command:
    C:\Windows\System32\MsDtc\Trace\msdtcvtr.bat -MODE 1
  • DTCPing and DTCTester – all the info is on the Internet, I won’t discuss their use here, but they can be very helpful.
  • DTC Settings – This KB perfectly describes the needed configuration on both your Manager server and SQL Server.
  • Well, almost perfectly – it does not mention Authentication. Here’s what you should do in regards to DTC authentication:
    • If your SQL Server is not part of a Failover Cluster, then you should select Mutual Authentication Required on both servers.
    • If your SQL Server is part of a Failover Cluster and you have a clustered DTC you should select Incoming Caller Authentication Required on the clustered DTC and the Manager Server. This is the generally recommended configuration for SQL Clusters.
    • If your SQL Server is part of a Failover Cluster and you do not have a clustered DTC you should select Mutual Authentication Required on each SQL node’s DTC and the Manager Server.
    • I mentioned Failover Cluster and I should make something clear about the clustered DTC: When the Manager Server connects to a clustered SQL instance, it first connects to the SQL node’s Local DTC, which redirects all consequent traffic to the Clustered DTC. This means that when you configure firewalls, DNS and networking, you should configure RPC and SQL access to each SQL Server node, the SQL Server Failover VIP and the clustered DTC VIP. This can be easily overlooked as often people allow traffic to the SQL Server instance but do not configure it for the DTC instance.

      Messy, huh? Just look at the picture below if my sentences sound like a verbal spaghetti bowl:clustered ms dtc

To conclude, this is not a definitive guide to DTC troubleshooting and configuration. But, I think it can serve as a good start for people trying to get their head around how vRA and SQL Server communicate. It can be messy and dark but in the end it can also be very satisfying to know you have defeated yet another scary creature coming out of the IT parallel world.

Take a vRealize Automation 7 Hands-On lab!

The post Troubleshooting vRealize Automation and MS DTC appeared first on VMware Cloud Management.


Guardian Life Insurance Gaining Efficiencies with VMware vRealize Suite

$
0
0

Recently Michael Lebiedzinski, AVP Cloud Engineering at Guardian Life Insurance, filled us in on all the work he and his team are doing in their environment. VMware cloud management tools have allowed Guardian to be more efficient with their large IT estate while also delivering higher quality IT services. As Guardian brings on new VMware tools, such as Log Insight, VSAN and VMware NSX they are finding even more possibilities to better service their business partners.

Guardianlife


Who is the customer

Guardian Life Insurance is one of the leading mutual life insurance companies with world-wide reach. With over a 150-year history, Guardian has not only stayed relevant but also prospered with a client first mentality and as they have adopted new and upcoming technologies to be more efficient.


Motivations


In an effort to automate IT, Guardian’s business goals continue to leverage technology to deliver products and services more efficiently. The IT management team took on a mandate to evaluate everything that was being done in their IT environments and to look for ways to innovate. The team found that the process to deliver services to customers (mainly application developers and test engineers) was taking too long. Additionally, there was often a mismatch between what IT was delivering and what the customers’ expectations were.


Solution


Guardian is taking a 2-phase approach: phase one primarily focuses on Infrastructure as a Service and Phase two is aligned with platform and application services. VMware vRealize Automation has allowed Michael and his team at Guardian to accomplish these goals and all within some aggressive timelines. The team has tailored the solution to their specific needs, for example:

  • ServiceNow® Integration – with a substantial investment in ServiceNow® the Guardian team wanted to leverage this familiar tool with vRealize Automation. When requesting new virtual machines, all requests go through ServiceNow® and vRealize Automation is what executes all of these requests in the background.

  • IT Automation – rather than automating an entire process all at once, the team at Guardian has broken up their processes into smaller tasks levering the vRealize Automation This has allowed them to rollback small changes if something fails, rather than start from scratch.


Results

Michael and his team are serving close to 800 developers that are much more efficient with their time and resources. A recent example is a developer who ordered 7 servers and received all of them complete and deployed in 7 hours. Infrastructure approvals used to take 4 business days, now they are complete in 1.1 days on average. Fulfilment (approvals to production ready) took 8 business days plus the potential for 3-6 tickets can now be done in 123 minutes. A Linux server takes 27 minutes and a Windows server takes 44 minutes. This is just the start for Guardian as they continue to gain more agility and realize more efficiencies in their IT organization.


Next Steps

Building on the success that Guardian has already accomplished, they are implementing vRealize Log Insight and vSAN. vRealize Log Insight will assist the team with valuable, up to date information and insights into their log data, both structured and unstructured. vSAN is deployed across remote office clusters to fully realize the efficiencies and cost savings of managing their storage virtually. Networking and Security is extremely important as Guardian is a large insurer. They are evaluating VMware NSX across various environments, including remote sites, to enable micro-segmentation and establishing remote networking and security to allow them to function as if they are all on one network.


Learn More

Need help deploying your private cloud infrastructure or developing your business justification? Contact us and our experts can help your team build the business case and the solution that will maximize your IT productivity.

For exclusive content and updates, follow us on Twitter @vRealizeAuto and subscribe to our VMware IT Management blog.

The post Guardian Life Insurance Gaining Efficiencies with VMware vRealize Suite appeared first on VMware Cloud Management.

vRealize Automation API Samples for Postman

$
0
0

The vRealize Automation REST API provides consumers and administrators access to all services in its service catalog that support the vRealize Automation user interface. All services have a set of use cases that can be achieved programmatically by using these REST APIs. vRealize Automation 7.1 and later documents these APIs in swagger format. We have prepared a set of API samples to help accelerate a developer’s ability to consume and integrate vRealize Automation programmatically.

vRealize Automation API Postman Samples

As the name suggests, these samples are provided in Postman collection format. Postman is a REST client popular for its rich set of features that make it easy to create API workflows. The API use cases that you develop can easily be shared. To learn more about Postman, download it for free and familiarize with Postman.

We have included sample use cases help you to become familiar with configuration and management actions such as:

  • Manage endpoints/reservations/business-groups/blueprints/catalog
  • Export and import content
  • Manager approvals
  • Submit and track requests

Try it out

After you download and install Postman, you can use the following information to quickly become familiar in using the vRealize Automations REST API samples.

Set Postman Environment

First of all, set the postman environment according to the hints provided in the following graphic:

postman_environment

Log in

Use any of the login calls available in the samples collection.

login

The environment variable {{token}} is set as a result of successful log in.

login_token_as_environment_variable

Subsequent API Calls

Furthermore each API method in the collection is already pre-poulated with an Authorization header that consumes this {{token}} variable. You can make subsequent calls as shown in the following graphic:

subsquent_postman_calls

For more details visit Github and follow the instructions provided in README. Each category has a README file that lists available use cases in the respective postman collection.

We welcome the customer and field development community’s contribution for helping us to make this a central source of vRealize Automation REST API use case samples.

Learn More

The post vRealize Automation API Samples for Postman appeared first on VMware Cloud Management.

Download Free vRealize ROI Report

$
0
0

VMware is pleased to announce the availability of a new vRealize Suite ROI calculatorDownload your free report today.
vRealize Suite ROI calculatorMany VMware customers like you are also modernizing data centers and integrating public clouds to address their digital transformation agenda.  VMware’s vRealize Suite, the market’s leading enterprise-ready Cloud Management Platform, can help you reach your IT goals.  But how can you justify a Cloud Management Platform investment?

vRealize Suite ROI Calculator

vRealize Suite ROI Calculator 2

The vRealize Suite ROI calculator can help you learn more about the key cost and benefit drivers that help to make the business case for a Cloud Management Platform.  Just select the type of use case you are trying to address and adjust a few default numbers about your virtual environment.  And voila!  The calculator will immediately give you an estimate in terms of the potential ROI, payback period, and net benefits.  You can even download a free report that you can share with your colleagues.  Click here to get your free vRealize ROI report today.

Cloud Management Challenges

Like you, many VMware customers find managing today’s app environments is becoming more complex from increased scale, more dynamic workloads, and adoption of multi-cloud computing.  Many also aspire to build and operate a private cloud that is efficient, delivers resources on a time scale appropriate for the business.  And it provides a user experience that meets the expectations of Lines of Business (LOBs).  Others need to manage both private and multiple public clouds in a way that allows IT to exercise an appropriate level of control without inserting intrusive governance.  It should not negatively impact developer and LOB efficiency or their satisfaction with the delivered services.

Learn More

To learn more about how VMware Cloud Management Platform solutions can help you with such challenges, visit us online at VMware vRealize Suite and vCloud Suite.  See how you can jump start your Modernize Data Centers initiative or Integrate Public Clouds initiative with VMware.

Additional Resources:

The post Download Free vRealize ROI Report appeared first on VMware Cloud Management.

Introducing vRealize Automation 7.3

$
0
0

We are proud to introduce the latest version of vRealize Automation — 7.3, the next iteration of VMware’s industry-leading cloud automation platform. While this is a an incremental “dot” release on the outside, it packs a punch in feature/functionality on the inside.

This release continues the trend of delivering awesome innovations, improved user experience and greater / deeper integration into the ecosystem its managing. Below is a summary of many of the new features and capabilities that are packed into vRA 7.3…

vRA’s Unified Catalog

Core Platform

Enhanced API’s for Deploying, Upgrading and Migrating vRA – As part of a continued effort to broaden and enhance API’s across the entire cloud management stack, vRA 7.3 adds and exposes API’s to programmatically install, upgrade, and migrate vRA. This work also provides the foundation for up-and-coming SDDC automation and lifecycle management tools.

REST API Improvements – Customers can now deploy, configure, manage and consume vRealize Automation using a variety of programatic interfaces thanks to vRA’s ever-evolving REST API. VMware has released several new resources to help promote the use of these APIs, including the vRealize Automation Programing Guide, an updated Postman collection that includes several of the most commonly used API’s, and many additions to VMware{code}.

Audit Logging Framework – Tracking and analyzing user activity and security events is a critical enterprise requirement. vRA’s new Audit Logging Framework provides system-wide logging and auditing capabilities to gain additional visibility into your vRA environment. The VAMI-accessible Audit Log Integration option adds seamless integration with vRealize Log Insight and other syslog solutions, enables logging of essential services across IaaS and .net (windows) services, can be used to audit workflow subscriptions, IaaS services and more. The new service can be enabled in the VAMI or via API.

Integrated Health Service

The once-stand-alone Health Service (i.e. vRPT) is now available within vRA admin interface. This service allows admins to gain visibility into overall health metrics of any supported vRA and vRO instance (7.3 or higher) for current health status and upgrade/migrate preparedness. The reports can be generated on demand or as part of a scheduled task.

Health Service Configuration Wizard

Service Delivery

Parameterized Blueprints – One of the most requested features is now available out-of-the box. Parameterized blueprints leverage Size and Image policies to drastically reduce blueprint sprawl and set consistent sizing policies (e.g. Small, Medium, Large, etc). This is also one of the primary use cases for XaaS blueprints to enable “t-shirt sizing”, now a native capability.

Requesting a machine with built-in “t-shirt sizing”


Intelligent Workload Placement (WLP) – vRA and vRealize Operations (version 6.6) come together to provide analytics-based initial placement policies for vSphere machines. vRA will utilize analytics data in vRealize Operations to optimize the placement of workloads according to performance goals. A ‘Balance’ policy is used to maintain maximum headroom in case of spikes while ‘Consolidate’ leaves space for large workloads.

vRA + vR Ops Placement Policy


Container Management – vRealize Automation’s container management engine now natively supports VMware Integrated Containers (VIC), allowing admins to add/manage VCH instances in vRA with a feature set similar traditional Docker hosts. vRA 7.3 also adds support for Docker volumes, allowing authors to create / attach volumes to containers and deploy volumes with container apps. This version also adds support for Docker Remote API 1.21.

Drag, drop and bind a container volume to container on the design canvas.


Config Automation Framework – vRA 7.3 adds native integration with external configuration management tools (starting with Puppet), adding the ability to drag-and-drop a Puppet configuration object directly on to a machine component in the Converged Blueprint Designer. Once dropped, you query a configured Puppet Master, Environment and Role, and dynamically assign puppet roles to a blueprint component. The integration also provides day-2 actions to unregister or delete assignments as needed.

Azure Public Cloud Service Design Enhancements – Overall enhancements to the new Azure Endpoint focuses on usability (ease of use). Azure in vRA 7.3 now enables application authors to drag-and-drop software components on to Azure machines during the design phase in the converged blueprint designer. This also provides the ability to specify software properties on the blueprint designer that can be leveraged at request time.

Adding software component to an Azure machine


Networking and Security

One of the most significant enhancements in vRA 7.3 is the deeper / richer integration with VMware NSX. This starts with native, API-based integration between vRA and NSX to expose more capabilities and improve overall performance. NSX is now a dedicated Endpoint, providing logical separation from the vSphere Endpoint(s).

On-Demand NAT Policy Enhancements

  • Enhanced NAT Port Forwarding Controls during blueprint authoring provides greater flexibility and feature-parity with NSX management.
  • NAT Day 2: Add / Remove / Reorder NAT Port Forwarding rules on a provisioned machine
  • Support for using IPAM (Infoblox) for IP addressing on On-Demand NAT Networks

On-Demand Load Balancer Enhancements

  • Enhanced Load Balancer Controls: Customize LB Algorithms, Persistence, Port(s), extended Health Monitor control, Transparent Mode (on/off), etc
  • LB Day 2: Add / Edit Virtual Servers, granularly modify LB policies

NSX Security Enhancements

  • Security Day 2: Change Security Policy (Security Groups and/or Tags) as a Day2 Action

Additional vRA + NSX Enhancements

  • Enable NSX Edge High Availability (configured per-blueprint)
  • Enable NSX Edge Deployment Size Selection (configured per-blueprint)

-+-+-+-

This is just a snapshot of the great new additions to vRealize Automation in this latest release. To learn more about vRA 7.3, refer to the resources linked below or drop a note to your friendly neighborhood VMware team.

Learn More:

Get Started:


+++++
@virtualjad

The post Introducing vRealize Automation 7.3 appeared first on VMware Cloud Management.

vRealize Application Service Migration tool – the How to guide

$
0
0

The more I’m working on customers upgrades and migrations, the more I’m realizing that many customers haven’t even heard about the vRealize Application Services Migration tool. In fact, shortly after the release of vRA 7.2 we released the vRealize Application Services Migration tool as well. Many of you know that the reason for developing the vRealize Automation migration tool was to “workaround” all the upgrade blocker issues like CCC, vCD or Application Services blueprints. After the vRA Migration tool was released all the physical endpoints and Application Services blueprints were just skipped without braking the migration process. But then you had to manually go into vRA and re-create all applications that you have created in the vRealize Automation Application Services (formerly known as vCloud Application Director or just AppD), using the new vRA components – Composite Blueprint and Software components.

That’s why I think that the Application Services Migration Tool need some more publicity, because it’s a great feature and can help the customers to migrate their multi-tier applications from vRealize Application Services 6.2.x to vRealize Automation 7.1 and later and easily convert them into Composite Blueprints with just few commands.  But what this Application services migration tool actually does? It converts Application services data into a format that is understandable by the vRealize Automation.  Applications and deployments profiles will be converted into Composite blueprints; services, external services and application components into software. The tool migrates also the properties and scripts to the corresponding software. All the dependencies between the VMs, software components and property expressions remain as they are in the Application Services Director.

This tool has some limitations that need to be known before starting using it.

  1. The target vRA environment where you import the Application Services blueprints should be migrated 7.1 or later version, not an upgraded or clean installed.
  2. It can export and import the blueprints only one by one, version by version. Grouping of blueprint versions into one package and exporting them is still not possible, but let’s remember that his is just the v1.1.0.
  3. You should keep in mind that the following objects are not migrated with this tool, some of them like e.g the Artifacts need to be migrated manually:
  • Artifacts
  • Artifact repository
  • Tags
  • Operating systems
  • Tasks
  • Policies
  • Logical templates
  • Templates with pre-installed services
  • Cloud provider
  • Deployment environment
  • Global Properties at deployment environment
  • Update, rollback, and teardown profiles
  • Deployment profiles with EC2 (Amazon) Cloud Provider Type
  • Deployment profiles with vCloud 5.1.2-5.5 Cloud Provider Type

In this blog post I want to show you the steps and some tricks for easily blueprint migration.  I’m currently using the following versions of the products:

  • vRealize Automation Application Services v6.2.4,
  • vRealize Automation (vCAC) v.6.2.4 migrated to vRealize Automation v7.3
  • vRealize Application Services Migration Tool 1.1.0
  • vRealize CloudClient 4.4.0

You can find the Application Services Migration tool and the CloudCloient tool on the vRealize Automation download page under the product “vRealize Automation” in the section “Drivers & Tools”.


Step1 # Exporting applications from Application Services Director


  • Download Darwin cli to your local machine from: http://<ApplicationServicesServerIP>/tools/darwin-cli.jar
  • Open a command prompt to where Darwin-cli.jar is located.
  • Java –jar darwin-cli.jar
  • Note: If your local machine is running Linux make the file executable using the following command: Chmod +x darwin-cli.jar
  • login to AppD appliance using following command:

login –serverUrl  https://<AppD-Server-URL>:8443/darwin –username mkoganti.admin@sqa.local –password Dynam1c0ps –tenantId sqa

where:

  • serverUrl is the IP address or FQDN of the Application Services Server, followed by the port (8443) and the default tenant
  • username is the service user name used for creating and administering the applications.
  • Password is the password for this service user (I know it’s in plain text, which is a bit annoying but it is what it is)
  • tenantId is the tenant from where you will export the application blueprints
  • export the application blueprint (in my case it is a DukesBank application) using the following command:

export-package –exportFilePath C:\AppD\export\DukesWithPassword.xml –fromGroup vCenter_bg –applicationVersion “Clustered Dukes Bank App:2.1.0” –serviceVersion “Apache:2.2.0,JBoss on Linux:5.1.0,MySQL:5.0.0” –uncompressed –substituteSecuredProperties true

where:

  • exportFilePath is the path to your local machine, where the package will be exported. The folders need to be pre-created.
  • fromGroup – the business group related to this blueprint
  • applicationVersion – this is the version of the Application Blueprint. Note: name and version should be separated by colon, without any space in between, otherwise the export will fail
  • serviceVersion – name and version of each software components. Note: name and version should be separated by colon, without any space in between, otherwise the export will fail
  • uncompressed – optional parameter
  • substituteSecuredProperties – must be set to true so that passwords are exported with a default value. If not set to true, the values of all secured properties are removed. If any passwords are a required property and exported without this option, the passwords will not have a value in the exported file and consequently the converted vRealize Automation ZIP file will not have a value for these passwords. This causes an error message to appear when you import the ZIP file with CloudClient

After the export has been completed successfully, you should the XML file DukesWithPassword.xml in your export folder (in my case it’s the C:\AppD\export\ – folder)

I will show you how to easily find the information you need:

  • Select the application you want to export and click on it
  • When you click on the blueprint, next to the arrow on the top left hand side you will find the exact name that you need to provide after the flag applicationVersion, the version should match exact to the Application Version which you would like to export
  • Type the business group name


Please note that your version of the application blueprint should have at least one deployment profile otherwise the export will fail.

  • Click on the schema on the right side to find the appropriate information that you need to provide after the serviceVersion flag:
  • Click on each Software Component and node the exact Library Service name and Version.

Please note: for the Version you need to provide a three digits number, so if you see a version, which is only two digits long, put a zero at the end

You are almost ready to migrate your blueprint to the migrated vRA 7.x. You now only need to download all artifacts from the current content server.

  • Select the blueprint you want to migrate, then the version of the blueprint, which you have exported. Click on the deployment profile.
  • On the first step in the section VM Templates, note all vRA corresponding blueprints and click Next
  • On the next page you will find you will find all Software Components files, which are stored on darwin.server or darwin.content.server (the local Application Services Server. These files will be needed by the vRA Software components, so you need to download them all manually from the Application Service content server to a location that is visible for the vRealize Automation Server (it could be any HTTP content server, accessible by the migrated vRA 7.x).

Please note that on this page there are several links for each software component, so make sure, that you have downloaded all of them.  You can resolve many import issues after migration by pointing the blueprints to the new content server.


Step#2 convert .xml file to .zip file:


  1. Download the Migration CLI called VMware_vRealize_Application_Services_Migration_Tool_1.1.0.jar to your local machine from https://my.vmware.com/group/vmware/details?downloadGroup=VASMT_110&productId=650
  2. Extract the file and open a new command prompt to where VMware_vRealize_Application_Services_Migration_Tool_1.1.0.jar is located.

Hint: you can rename the file to migration-cli.jar

  1. Run this command replacing the values …


java -jar migration-cli.jar migrate —url=url —username=user_name —password=password —tenant=tenant —appdfile=file_path [–uncompressed=value]*  —outputdir=output_directory [–usemachineifreqd=value]*  [-–debug=value]*

*optional

where:

  • url is the URL of the target vRealize Automation server.
  • username is a vRealize Automation user with Service Administrator and Catalog Administrator roles.
  • password is the vRealize Automation user password.
  • tenant is the vRealize Automation tenant where you will import the blueprints
  • appdfile is path to the vRealize Application Services ZIP or XML file, which you have exported in the previous step
  • uncompressed is an optional parameter. Set to true if the vRealize Application Services file is not a ZIP file.
  • outputdir is the output folder, where the ZIP file will be stored.
  • usemachineifreqd is an optional parameter. You can find more information in the Application Services Migration Tool User Guide
  • debug is an optional parameter. If set to true, the log includes debug information.

After running the command, you should see something like this:

Don’t worry about the warnings, they are just saying that the Darwin.content server is not visible for the vRA, so many of the properties are currently not available, but you will fix is after the blueprints are imported into the vRA.


Step#3 : Import your .zip file to vRA 7.x


Before importing your .zip files, you need to modify your vRA blueprints (that are referenced by Dukes bank app) in vRA to point to a new template. Different template is needed for provisioning dukes bank with 7.x., you will need a template that has the Software agent used in vRA 7.x.  You can download the new agent by visiting this address: https://<migrated-vRA-7x>/software/index.html

I used mk-appd-test1 with 6.2.4 and centos63x64-appMigration-JRE1.6 with 7.2

Download Cloud Client from the official VMware’s download page.

  1. Cmd to location where your Cloud Client is extracted
  2. Run the following command to run the bat file bin\cloudclient.bat
  3. Once cloud client opens up, login to vRA using this command:
    vra login userpass —server <vRA-hostname-or-IP> —user service.admin@sqa.local —tenant sqa
  4. When prompted, provide password for user service.admin
  5. Trust the certificate (Y/N)
  6. Trust IaaS Certificate (Y/N)
  7. Use below command to check the contents in vRA vra content list

You should see a list like this one:


  1. Run the following command to import content to vRA.

vra content import —resolution OVERWRITE —path C:\AppD\output\ClusteredDukesBankApp210_mk_dukes.zip –precheck WARN

NOTE: service.admin@sqa.local (user who is performing the import) should have Software Architect role and Application architect role in vRA 7.2

Where:

  • resolution – means if the command should overwrite or not if there is such blueprint in the target environment
  • path – is the folder where the ZIP file created in the previous step is located
  • precheck WARN means to skip the warning and import it anyways


Step#4 : Update imported dukesbank blueprint to work with 7.2


  • Navigate to each software component. Delete property ‘global_conf’.
  • In the action scripts, comment out the line importing global_conf

#. $global_conf

  • Invoke canvas of dukes bank application. Click on the software component.

Wherever it refers to darwin.server or darwin.content.server url(Ex: http://${Darwin.Content.ServerIP} /artifacts/services/jboss/cheetah-2.4.4.tar.gz) replace the IP or hostname with the IP or hostname of the new HTTP content server.

  • Save the blueprint. Now your blueprint is ready for provisioning.


If you are interested in what’s new in vRA 7.3 please check the vRA 7.3 release notes

Here is a high-level blog introducing the vRA 7.3, including all new features.


The post vRealize Application Service Migration tool – the How to guide appeared first on VMware Cloud Management.

How to configure Auto-Scaling for Private Cloud

$
0
0

Purpose:

Have you checked the auto-scaling feature provided in public cloud solutions like AWS and Azure and wished to get the same feature in your private cloud environment? Do you have an existing private cloud environment or building a new one and want to make it auto-scale enabled? This post covers this exact topic. It details what auto-scaling is and provides step by step guide on how you can build one using various VMware products.

Introduction:

In recent months, during my interactions with customers, one requirement came up pretty often than others. That is of auto-scaling. Seems majority of customers who deploy Private Cloud require auto-scaling in some or other formats. Since out of the box vRealize Automation provides “Scale-Out” and “Scale-In” functions (albeit manual), these can be used in conjunction with other products to provide auto-scaling functionality. I had to configure this feature for multiple customers, so thought of writing a blog post detailing the steps. Readers can follow the blog to do it themselves. Also, auto-scaling is very dynamic in nature. Typically auto-scaling parameter requirement changes from environment to environment. Keeping that mind I have explained the steps involved so that you can customize it as per your need.

Required prior knowledge:

Though you can simply import the package in vRealize Orchestrator and follow the guide to configure other products, having a knowledge of the following will help you further configure it.

  • Working knowledge of vRealize Orchestrator
  • If you want to customize the workflows, then you need to know a bit of JavaScript
  • For configuration of Webhook Shims, basic knowledge of Linux will help (though not strictly required, John Dias did an amazing job providing step by step guide).
  • Familiarity with vRealize Operations Manager will help
  • Working knowledge of vRealize Automation is required
  • If you want to replicate my example of multi-tier application with application installation at runtime. Then you need to know NSX usage and advanced configuration of blueprints in vRealize Automation.

If you are using vRealize Automation 7.2 and prior, then this blog post on NSX integration with vRA will help. Integration method has changed in 7.3 and it is simplified a lot. Check the VMware documentation on how it is done in vRA 7.3.

On how to configure Software components you can check my earlier blog post here.

Acknowledgement:

Before I start writing this blog I need to say thanks to few people. Though I demonstrated this feature (with PowerCLI and vCenter) 2 years back to a customer, it was never a true auto-scaling solution. So, here it goes:

  • First and loudest thanks to Carsten Schaefer for com.vmware.pso.cemea.autoscaling package. It had the main “Scale Up Blueprint Layer based on VM MOID” and “Scale Down Blueprint Layer based on VM MOID”. All my other works are based on these two core workflows. These two workflows do the actual task. So thanks a lot mate for your hard work and help.
  • Thanks to Vishal Jain, Diwan Chandrabose, Ajay Kalla and team for the Load balancer handling script. Normally when an alert is fired, it is based on a VM. But when network load comes from Load-Balancer and it fires an alert, we get the load balancer name. The script co-relating the load balancer to the corresponding virtual machine is written by the team. They showed how we can use NSX and vROps integration to handle load balancer parameters. Thanks a lot guys for this.
  • Last but not least Vinith Menon, I was wondering how I would put a load on the test website. I was thinking of using JMeter. But it was too much to just put HTTP requests on a web page. Your one liner is absolutely fantastic and time saver for me. Thanks a lot brother for that.

My friend Vinith Menon also have written a blog post on auto-scaling. You can check it here.

Where to get the package for auto-scaling?

I have created a single vRealize Orchestrator package containing all the workflows, SNMP Policy and Action items. Download the package from the GitHub repository (https://github.com/sajaldebnath/auto-scaling-vra) and import it into vRealize Orchestrator server. Rest of the details are provided in the rest of the blog post.

What is included in the package?

The following workflows are included in the package:

  • Scale Down Blueprint Layer based on VM MOID
  • Scale Up Blueprint Layer based on VM MOID
  • Scale Down vRA Deployment based on LB Load – SNMP
  • Scale Up vRA Deployment based on LB Load – SNMP
  • Scale Down vRA Deployment based on CPU-Mem Load – vROps REST Notification
  • Scale Up vRA Deployment based on CPU-Mem Load – vROps REST Notification
  • Scale Down vRA Deployment based on LB Load – vROps REST Notification
  • Scale Up vRA Deployment based on LB Load – vROps REST Notification

The helper workflows are:

  • Count VMs in Layer
  • Get VM Name from vROps REST Notification
  • JSON Invoke a REST operation
  • Submit to vRA

The action items are:

  • getCatalogResourceForIaasVmEntity
  • findObjectById
  • getVirtualMachineProperties

The included SNMP policy is:

  • vROPS SNMP Trap for NSX

Note, the first two workflows are core workflows (written by Carsten) all other workflows depends on these two to get the work done. If you are not using Webhook Shims, then you do not need to configure workflows which endds with “vROps REST Notification”. Also, for SNMP, you do not need to configure “Get VM Name from vROps REST Notification” and “JSON Invoke a REST operation” workflows. Alternately, if you are not going to use SNMP traps, then you do not need to configure the SNMP policy.

Pre-Requisites:

Before you can run everything you need to have the environment ready. I used the following versions:

  • vRealize Automation 7.3
  • vCenter & vSphere 6.5
  • vRealize Operations 6.5
  • vRealize Orchestrator 7.3 (internal to vRA)
  • NSX 6.3
  • Webhook Shims

The workflows should work with other versions as well. You need to have these products installed, configured and integrated to follow the example end to end.


Conclusion:

You can use the steps detailed in the video to configure auto-scaling in your environment. This is an amazing feature. It will be a real help if you can test it out and let me know the outcome. Also, any further suggestions are welcome. I hope this helps you as it helped me. Do provide me feedbacks on this. Also, let me know if I missed something or you need further clarification.


The post How to configure Auto-Scaling for Private Cloud appeared first on VMware Cloud Management.

vRealize Automation 7.3 Dual NIC Support

$
0
0

VMware vRealize Automation 7.3 introduces the support for two NICs on all nodes. In this blog post, we will cover the steps to configure your vRA environment with dual NICs and look at two vRA 7.3 dual NIC use cases. This blog should be helpful for anyone looking to deploy vRealize Automation 7.3 with dual NICs. The two use cases we will look at are:

  1. Separate User and Infrastructure Networks
  2. Additional NIC for IaaS nodes to join Active Directory Domain

Configure vRealize Automation 7.3 environment with Dual NICs


Configuring your vRA environment with dual NICs is easy!


Configure Dual NICs on your VA’s:

  1. Add a second NIC to your VA’s. If you’re hosting your VA’s in a vCenter environment, follow these steps:
    1. Log into vCenter
    2. Right click the VA and click Edit Settings
    3. Add an additional “VMXNET 3” NIC to the VA.
  2. Reboot the VA (if it’s currently powered on).
  3. After rebooting, perform the following steps:
    1. Log into the VAMI of your vRA appliance
    2. Click the Network Tab. You will now see two NICs available. Cool!
    3. Click the Address tab
    4. Configure the NIC’s IP address.
  4. If you are deploying an HA environment, make sure you load balance the IP addresses for the second NICs. Details regarding vRA load balancing can be found in the vRealize Automation 7.3 Load Balancing
  5. Make sure your DNS is configured properly so that both VRA IPs on the appliance map to the same FQDN. Both Load Balancer VIPs should also map to the same FQDN. You may need to configure Split DNS on your environment for this. See the tables in the Use Case examples below for a clearer picture of the FQDN to IP mappings.


Configure Dual NICs on your IaaS VMs:

  1. Add a second NIC to the IaaS nodes. If you are hosting your IaaS nodes in a vCenter environment, follow these steps:
    1. Log into vCenter
    2. Right click the IaaS VM and click Edit Settings
    3. Add an additional NIC to the VM.
  2. Follow steps from Microsoft to configure the second NIC and its IP address on your Windows IaaS VMs


For additional details regarding installing and configuring your vRealize Automation 7.3 environment, refer to the vRealize Automation documentation.


Use Case 1: Separate User and Infrastructure networks


For this use case, we look at a vRA setup which is configured on a network used to host an organization’s Infrastructure that end users do not have access to. A second NIC is added to the vRA VA’s to provide end users with access to vRA, and prevent them from gaining access to resources configured on the “Infrastructure network”.


Topology:


Hostname and IP examples:

NOTE: The FQDN of the vRA appliances and VIP must be the same on both networks. Split DNS may be required so that the vRA node’s and VIP’s FQDN on the Infrastructure network resolve to the Infrastructure network IPs, and the vRA node’s and VIP’s FQDN on the User network resolve to the User network IP addresses. See the above table for clarification.


Firewall:

In this use case, we are using NSX security policies to block all traffic from the user network to the vRA Nodes and VIP on the User Network side, except for ports 443 (HTTPS) and 8444 (Remote Console).


We also configure firewall rules on our NSX Edge Load Balancer for additional security.


These settings allow end users to access and use vRealize Automation, and access the remote console for any managed VMs they provision with vRealize Automation. All other ports are blocked to prevent end users from gaining unnecessary access to the VAs.


Configuration:

To configure this topology with a vRA HA setup, proceed with the normal vRA HA installation but add the following steps before installing:

  1. Configure your vRA nodes with a second NIC for the User Network and make sure to load balance them
  2. Make sure to set the appropriate firewall rules on the User Network so that users can only access port 443 and 8444 from the user network
  3. Make sure to use the same FQDN’s for both IPs on your vRA appliances, and the same FQDN for both VIPs. Split DNS may be required in order for you to implement this.

If you already have a vRealize Automation 7.3 environment installed and configured, you can add a second NIC to your nodes following the same steps above.


Use Case 2: Additional NIC for IaaS nodes to join Active Directory


In this Use Case, all nodes in a distributed vRA setup are deployed on an Infrastructure network, but there is no Active Directory server on the Infrastructure network. vRA requires the IaaS nodes be joined to a domain and use domain service accounts to run the IaaS services. So here we have Active Directory deployed on a separate network and need to add a second NIC to our IaaS nodes and attach it to that network, so they can join the domain and use domain service accounts.

Topology:

Hostname and IP examples:

NOTE: The FQDN of all nodes must be the same for both IP addresses in DNS. See the above table.


Configuration:

To configure this topology:

  1. Add a second NIC to the IaaS nodes before installing vRA
  2. Join the IaaS nodes to the domain
  3. Ensure the FQDN for each node is the same on both networks in DNS.
  4. When installing vRA, use domain users from the Active Directory you joined your IaaS nodes to, to run the IaaS services.


Wrapping things up


vRealize Automation 7.3 provides the ability to add a second NIC to your vRA and IaaS nodes. We highlighted two use cases here although using dual NICs is applicable to many different use cases.

For additional details regarding installing and configuring your vRealize Automation 7.3 environment, refer to the vRealize Automation documentation.


The post vRealize Automation 7.3 Dual NIC Support appeared first on VMware Cloud Management.


Puppet Wins 2017 VMware Partner Innovation Award

$
0
0

Congratulations Puppet on winning the regional VMware Partner Innovation Award! Puppet and VMware have a long history partnering that has borne fruit across multiple dimensions.  Most recently the joint work across vRealize Automation and Puppet Enterprise has delivered value to our common customers in the areas of configuration management and automation.


Recently, we announced the release of Puppet plug-in for vRealize Automation, that leverages the latest Configuration Management framework provided in vRealize Automation 7.3, This integration enables our customers to model various services using a vRealize Automation blueprint, and subsequently triggers Puppet to configure and continually manage those services. As a result, customers can now seamlessly deploy, configure and manage production-ready complete stacks that include OS, middleware or applications by utilizing vRealize Automation’s powerful blueprinting, service orchestration and governance workflows, in combination with Puppet’s configuration management capabilities.


puppet
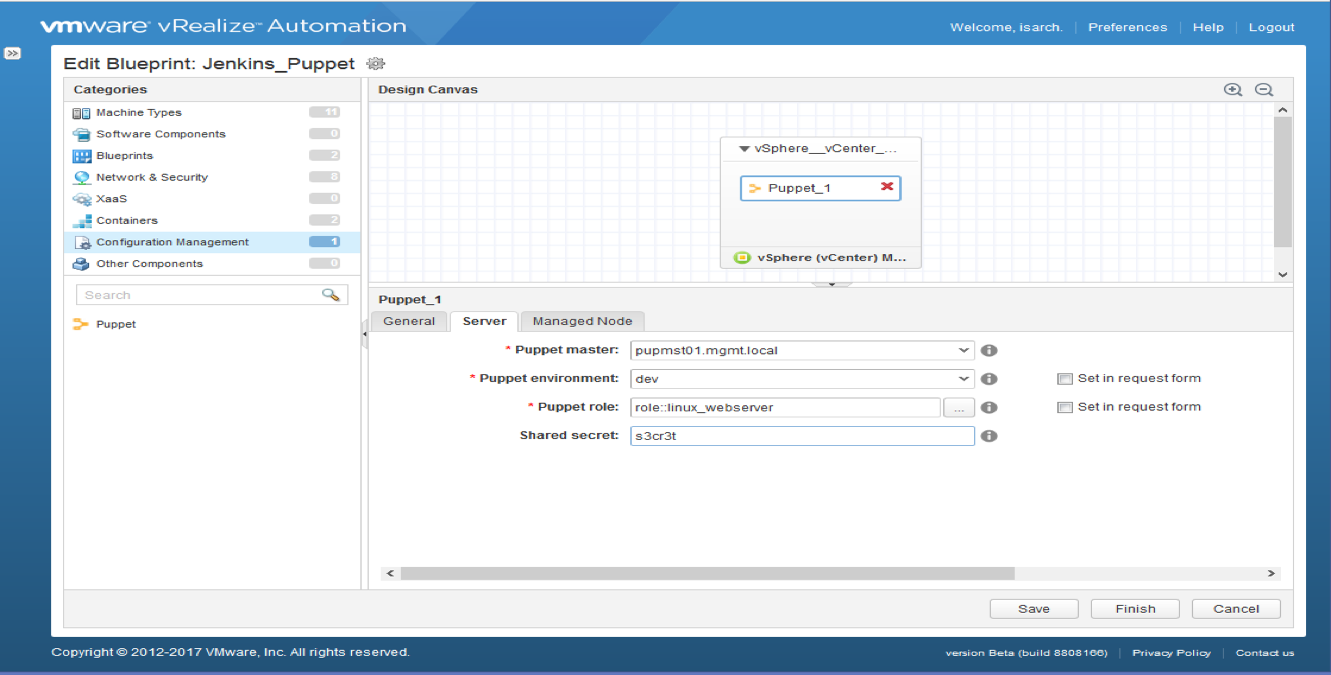
Agility is the key to accelerate digital transformation. For an IT team, this can be translated as the capability to quickly serve application developers so as to address their infrastructure, operating system, middleware, and other service needs. vRealize Automation delivers agility through enabling self-service workflows while integrating into existing IT ecosystem tools and processes. Sound ambitious? vRealize Automation makes it happen through its uniquely extensible platform, that integrates with and can cover the gamut of ecosystem tooling prevalent among our customers. Puppet, as one of the leading vendors in configuration management domain, demonstrates how VMware and our ecosystem partners together bring the best-of-breed to continuously create more value for our joint customers. Congratulations once again to Puppet and we look forward to more innovative joint solutions!


Learn more

  • Download Puppet plug-in for vRealize Automation here.
  • Check out vRealize Automation product page here.


The post Puppet Wins 2017 VMware Partner Innovation Award appeared first on VMware Cloud Management.

Scaling a vRA 7.3 Environment (Part 1)

$
0
0

Let’s say you’re the kind of person that doesn’t like wasting resources – you use public transportation, electric if possible (here in Eastern Europe we love EVs), you separate your trash, buy new mountaineering equipment only when necessary, always turn off the lights in the bathroom and you really like the scaling features of virtual infrastructures. Even if you’re only a fan of the “grow on demand” concept it’s all right – this blog is for you. On a side note – you should really consider using public transportation and separating your trash if you don’t do it already.

Many of the vRA deployments are the so-called “Distributed” deployments – mostly because of HA considerations. However, while meeting redundancy requirements, those environments waste too many resources, because they rarely hit a performance issue. In addition, if you’ve ever built vRA at any point in time you know that it requires just too much of Windows virtual machines, kaiju appliances and external databases. So, if you don’t have any requirements for HA, because, let’s say your DR scenario pretty much covers all of the HA aspects or you’re just building a PoC, you can safely start with what I call a “single-node distributed environment.” Here’s an over-simplified diagram of the Large configuration found in the vRA Reference Architecture:

As you can see, we have only one node for each role (the Manager server, DEM and proxy agent are even combined into a single server, but you can separate them if you want) and at the same time we’re using separate load balanced FQDNs.

When scaling the environment, this is what we are trying to achieve:

I have split this blog into three different parts:

  1. Installing a single-node distributed environment.
  2. Scaling the environment with vra-command.
  3. Scaling the environment with the Config REST API.

Let’s begin with the installation, which not only is very easy, but also requires a lot less preparation – only 3 virtual machines. So, we begin with the preparation:

  • Certificates – we need three certificates. The certificate for the web server needs to be a SAN certificate containing the FQDNs of the load balancing endpoint and the IaaS web server itself:
  • Load Balancing Endpoints – or the pompous way of saying “CNAME records” in this case. Why would you need to waste three VIPs in your load balancer when you could just point to the one and only node you have? Remember, we stop the water when soaping.
  • Service Account – Use an Active Directory service account with the minimum set of permissions and a tough password.
  • Prepare your SQL Server machine – for security, availability and licensing reasons keep your database on a separate server.

Here is a guide to installing this type of environment covering the most crucial parts:

  1. Choose an Enterprise deployment and check “Install Infrastructure as a Service” (duh!):

See how there’s a nice picture on the right of what we want to achieve. Pretty neat!

2. Install the Management agents:

3. On the vRealize Automation Host page select Enter Host and type the load balancing FQDN you created as a prerequisite.

4. On the IaaS Host page type the load balancing FQDNs of the IaaS Web service and the Manager Service.

5. The Load Balancers page sums up our little setup. Just make sure all the info here is correct.

6. Go ahead – validate, create snapshots (absolutely mandatory, I wouldn’t even say it’s recommended) and click Install.

Great, you have your distributed vRA environment now!

Next post – how to scale this environment by using the embedded command line tool vra-command.

You may want to check the new features in vRA 7.3 in the meantime!

The post Scaling a vRA 7.3 Environment (Part 1) appeared first on VMware Cloud Management.

Enabling DevOps with vRealize Automation and Puppet

$
0
0

Enterprise IT and DevOps teams are under tremendous pressure to efficiently deliver, operate and maintain infrastructure to support the needs of the business and its customers. It can take weeks to deliver production ready infrastructure and in response CIOs are looking for faster, self-service provisioning solutions.

Until recently, vRealize Automation (vRA) integrated with various configuration management tools (e.g.: Puppet, Chef, Salt) only via XaaS services and vRealize Orchestrator workflows.  Now we are making the integration one step closer…

With the latest release of vRealize Automation 7.3, configuration management is now a “first class” citizen in vRealize Automation. By leveraging the new configuration automation framework natively, customers can easily deploy, configure and manage production-ready applications with various external configuration management tools.

Puppet is the first eco-system partner to leverage the framework. With this customers can now seamlessly integrate with Puppet Enterprise directly via vRealize Automation GUI. Key capabilities includes:

  • Configuration Management Server/Puppet Master as an end-point in vRealize Automation
  • Single vRealize Automation instance supporting multiple Puppet Masters
  • Ability to drag and drop Puppet component in the vRA Blueprint design canvas
  • Automated installation of the Puppet agent and enable secure Puppet certificate signing for provisioning
  • Dynamically query Puppet Master, Environment and Roles in the vRA Blueprint design canvas
  • Dynamically assign Puppet Roles per vRA Blueprint component
  • Ability to do late binding whereby developers can select the Puppet Environment and Roles at provisioning time
  • Ability to import/export Blueprint in a YAML format with Puppet schema attached
  • Support Day 2 actions (automatic purging of decommissioned nodes and reclamation of puppet enterprise node license)


With vRealize Automation (Enterprise edition) and Puppet Enterprise, customers can now quickly benefit from the fully automated delivery of applications, middleware software and services, all exposed in a self-service catalog from weeks into minutes! The out of box integrations not only simplifies the developers to create and configure the virtual machines but also continuously enforce the desired state and ensure compliance with enterprise policies.


Learn More:  

The post Enabling DevOps with vRealize Automation and Puppet appeared first on VMware Cloud Management.

July 19th Webinar: Infoblox + VMware – Reducing Network Delays in VMware Cloud and SDN Environments

$
0
0

Too often in cloud, virtualized, and SDN deployments, the handoffs and delays with manually provisioning IP addresses and DNS records can add hours, days, or even weeks to the process. The lack of automation also causes inconsistency, outages, and security risks when provisioning and destroying VMs and NSX devices. VMware and Infoblox have teamed up to eliminate the manual processes and custom scripts. Join the live webinar to learn how to optimize your VMware Cloud and NSX deployments by leveraging IP address and DNS provisioning as part of your automation and orchestration workflows.

vra infoblox

The webinar will discuss:

  • New enhancements in VMware NSX and cloud solutions
  • How to leverage vRealize Automation and vRealize Orchestrator to streamline the workflow
  • The power of DNS and IP address automation and clean up

Included will be a demo on how seamlessly VMware vRA/vRO integrates with Infoblox.

Join our Webinar on July 19, 2017 at 10:00 AM PDT and please Register Now.

Presenters:

·         Simon Hamilton-Wilkes, NSX Technical Architect, VMware

·         Matt Gowarty, Senior Product Marketing Manager, Infoblox


Learn More

  • Try our software in a hosted Hands-on-Lab Environment here
  • Go to vRealize product webpage here


The post July 19th Webinar: Infoblox + VMware – Reducing Network Delays in VMware Cloud and SDN Environments appeared first on VMware Cloud Management.

Scaling a vRA 7.3 Environment (Part 2)

$
0
0

Last time we installed a distributed vRA 7.3 environment by using only one node per role.

Here comes the time when you have to add another node for each role, to the vRA setup, because vRA has become a critical asset and you want to lower the downtime of the service.

There are a few ways to do it and most people usually choose the most boring one – using VAMI and the Suite Installer (meh). You’ve got other options, though. Options like the uber cool vra-command tool present in every vRA virtual appliance instance. Apart from acting like the cool kids on the block, automating these tasks gives you the option to add nodes whenever you feel the need for better performance of your cloud services.

Appliance

Let’s begin with adding a second virtual appliance to the environment. The process is a bit weird – we’re not really adding a second appliance, but inviting it to join the cluster on behalf of the current node. For clarity, let’s just name the already installed node Node01 and the new node Node02. This is the procedure you have to follow:

  1. Deploy the new appliance with all needed host settings like IP address, DNS servers, etc.
  2. Connect to SSH on Node01.
  3. Get the VAMI certificate of Node02, so Node01 can trust it:
NEWVACERT=`echo -n | openssl s_client -connect node02.domain.local:5480 | sed -ne '/-BEGIN CERTIFICATE-/,/-END CERTIFICATE-/p'`
  1. Get the node ID of Node01:
vra-command list-nodes
  1. And now issue the following command:
vra-command execute --node cafe.node.ID cluster-invite --VaHost node02.domain.local:5480 --VaUser root –VaPassword SomePass  --VamiCertificate "$NEWVACERT"

Just make sure to substitute the node ID and password parameters.

And you’re ready to proceed with adding the two servers to your load balancer of choice. Don’t use DNS round robin – it’s not even a poor man’s solution to load balancing.

Manager

How about adding a new manager server, so you can be sure it’s always on? vRA 7.3 features automatic failover of the Manager service which is one of the best new additions to the product.

  1. Install your new Manager server and all needed prerequisites.
  2. Import the Manager service certificate into the Machine Personal certificate repository.
  3. Install the Management Agent from https://vanode:5480/i. Since we’re on the topic of automating vRA, you can just use a script to install the agent.
  4. Connect to SSH on Node01.
  5. Get the Node ID of the new Manager server:
vra-command list-nodes
  1. Get the fingerprint of the Manager service certificate (make sure you connect to the Load Balancing FQDN that you specified during installation):
MGRCERT=`echo -n |openssl s_client -connect  nn-scale-mgr.domain.local:443 | openssl x509 -noout -fingerprint|sed -e 's/://g' -e 's/^.*=//'`
  1. Install the service:
vra-command execute --node "Manager-Node-ID" install-manager-service --SqlServer "your-sql-server-fqdn" --DatabaseName "your-db" --UseWindowsAuthentication True  --IaaSWebAddress 'nn-scale-web.domain.local' –SecurityPassphrase 'dbpass' --ServiceUser "domain\\nn-svc-vcac" --ServiceUserPassword 'ServiceUsrPass' --ManagerServiceStartAutomatically True --ManagerServiceFailoverModeEnabled True --ManagerServiceCertificate "$MGRCERT" --VraAddress "nn-scale-va.domain.local"

Make sure to substitute all parameters according to your environment. Did you see the ManagerServiceFailoverModeEnabled flag? It is mandatory if you want your new manager server to assume the passive role automatically.

  1. Configure your load balancer.

DEM

The procedure to add a DEM orchestrators and Workers is almost identical. Just issue the following commands:

  1. Get the node ID of the node you’re trying to install. You should have the management agent running already on it.
vra-command list-nodes
  1. Get the vRA Automation Console certificate fingerprint (the load balancing endpoint of the VAs):
VRACERT=`echo -n | openssl s_client -connect  nn-scale-va.domain.local:443 | openssl x509 -noout -fingerprint|sed -e 's/://g' -e 's/^.*=//'`
  1. Install the DEM Orchestrator:
vra-command execute --node "DEMOnodeID" install-dem --ServiceUser "domain\\nn-svc-vcac" –ServiceUserPassword 'ServiceUsrPass' --DemName "DEM2" --DemDescription "Secondary DEM Orch" --DemRole Orchestrator --ManagerServiceAddress "nn-scale-mgr.domain.local" --IaaSWebAddress 'nn-scale-web.domain.local' --WebUserName "domain.local\\nn-svc-vcac" --WebUserPassword 'WebUserPass' --VraAddress "nn-scale-va.domain.local" --VraWebCertificateThumbprint "$VRACERT"

The WebUserName parameter in most cases is the service account username you’re using.

  1. Install the DEM Worker:
/usr/sbin/vra-command execute --node "DEMWnodeID" install-dem --ServiceUser "domain\\nn-svc-vcac" --ServiceUserPassword 'ServiceUsrPass' --DemName "DEMW2" --DemDescription "Second DEM W" --DemRole Worker --ManagerServiceAddress "nn-scale-mgr.domain.local" --IaaSWebAddress "nn-scale-web.domain.local" --WebUserName "domain\\nn-svc-vcac" --WebUserPassword 'ServiceUsrPass' --VraAddress "nn-scale-va.domain.local" --VraWebCertificateThumbprint "$VRACERT"

No load balancing configuration is needed for the DEM roles.

Web Certificates

Finally, the Web Server installation seems like the most difficult part to implement, because of the certificate issues. Remember how we installed the Web role by using a SAN certificate with only one Web node? If we want to successfully install a new web server we should first replace the existing certificate with one containing the new node’s FQDN:

  1. Create a new certificate with the new node’s FQDN:
  2. Convert the certificate to a PEM file containing both the private key and the public key chain.
  3. Set the public and private keys to some variables, e.g. $publicKey and $privateKey. You can use your preferred tool for extracting them.
  4. Get your current Web Server Node ID:
vra-command list-nodes
  1. Install the certificate:
vra-command execute --node "WebNodeID" install-certificate --CertificateData "${publicKey}" --PrivateKeyData "${privateKey}" --CertificatePassword "CertPass" --CertificateFriendlyName "new scaled web service" --StoreNames "My;TrustedPeople" --StoreLocation "LocalMachine"

This command will automatically import the new certificate int the certificate store of the specific node. The downside is that it should be executed against each web server if you already have more than one and also you will have to actually manually configure your IIS. Therefore, for now my recommendation is to just use VAMI or the API (coming soon as part three) for certificate replacement.

Web

Finally, we’ve got everything in place, so let’s just go on with installing our new Web server:

  1. Install the Management agent.
  2. Get your new Node ID.
  3. Import the Certificate in the Personal store of the machine.
  4. Get the Web certificate thumbprint (hint: you can modify one of the above openssl commands).
  5. Get the vRA Automation Console certificate thumbprint.
  6. Install the Web role:
vra-command execute --node "WebNodeID" install-web --SqlServer "SQLServerFQDN" --DatabaseName "nn-scale-vra" --UseWindowsAuthentication True  --IaaSWebAddress 'nn-scale-web.domain.local' --SecurityPassphrase 'SecurityPass' --ServiceUser "domain\\nn-svc-vcac" --ServiceUserPassword 'ServiceUserPass'  --VraAddress "nn-scale-va.domain.local" –VidmAdminPassword 'vIDMAdminPass' --VraWebCertificateThumbprint "vRACertThumbprint" --WebCertificate "WebCertThumbprint"

So, this is it. Using vra-command is a great way to manage your vRA infrastructure. Go ahead and play with its other options.

The post Scaling a vRA 7.3 Environment (Part 2) appeared first on VMware Cloud Management.

Viewing all 216 articles
Browse latest View live


<script src="https://jsc.adskeeper.com/r/s/rssing.com.1596347.js" async> </script>